Big Inch Shovel - Build Thread

jayzedkay

Club Member
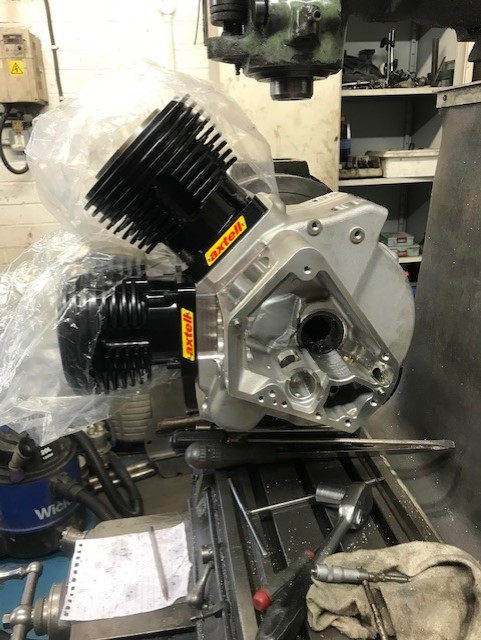
After I built my 98" shovel motor, some years ago now, several at least. I developed a big-inch 'itch' that kept periodically returning. I managed to keep it under control, convincing myself it was completely unnecessary practically, monetary and whatever else in between. But that damn itch kept coming back, it got the better of me in the end and I took the plunge, ordering parts to start the process.

It started some time back. All in, it's taken well over a year to get the cylinders and pistons from R&D Machine in the US, who have recently taken over Axtell and then to obtain the crankshaft assembly from TnO, who were waiting on flywheel blanks for given stroke. Ultima 3 5/8 shovel cases and Ultima 3 5/8 shovel-heads obtained through a contact in no time.

The build is going to be 114", based on 3 13/16" bore with 5" stroke.
The above spec goes against everything 'recommended' and 'practical' for a big-bore/stroker build compared to easily available 3 5/8 parts.
I'd already built and have my 98", which I have to say, I believe is the ideal size, entry-level shovel motor in fact.
A 103" isn't enough increase to justify. so 114" it has to be. Beyond that it just gets too 'exotic'.

Design and purpose of this engine sits firmly in the low-to-mid rpm range, as i built my 98".
Acceptable street manners and torque in mind. Mile crunching, touring. I rarely ride my shovel locally just dickin' about.
Not interested in numbers at 6k, 5k or even 4? It will never be there, certainly not beyond 4k.
An engine only has a relatively 'small' region of optimal performance. I will make that region where i ride most 2-3k
Couple that with the inherent weaknesses of a long-stroke motor compared to a more square motor; vibes, wear etc.
I want main rpm use low to keep vibes and wear to a minium and longevity to a maximum.
I'll never build a motor like this again, it's far too much hassle, as it's been so far, right at the start.
I want it to last as long as possible. Beyond my life/ownership expectancy?

So at it's core hardware is as follows, but lots of mods/detail to be implemented in the build and not just assembling parts.
TnO crankshaft assembly; Torquemonster 'heavy' wheels, 5" stroke.
R&D Machine 'Axtell' 3 13/16" cylinder & Pistons (JE).
Ultima 3 5/8 shovel-cases.
Ultima 3 5/8 shovel-heads.
BMO 'Velvatouch' lifter-blocks and lifters; Evo-cam, Evo-oiling.
OEM Evo-rockers.
Camshaft; I have a couple of contenders at this stage; VThunder or a Woods, head-works/capabilities will dictate decision.
Carburettor is going to be an SU.

The build has started, but it is slow progress due to one thing and another; waiting on parts to be machined, other commitments, work, life etc etc. Anyway, I'll add stages to the thread detailing what i'm doing/done. Some in retrospect, other as progress is made. Hopefully folks find it interesting and informative and possibly enthuses a fellow shovel owner to build their own motor, stock or otherwise. They ain't rocket-surgery, but an antiquitated lump.

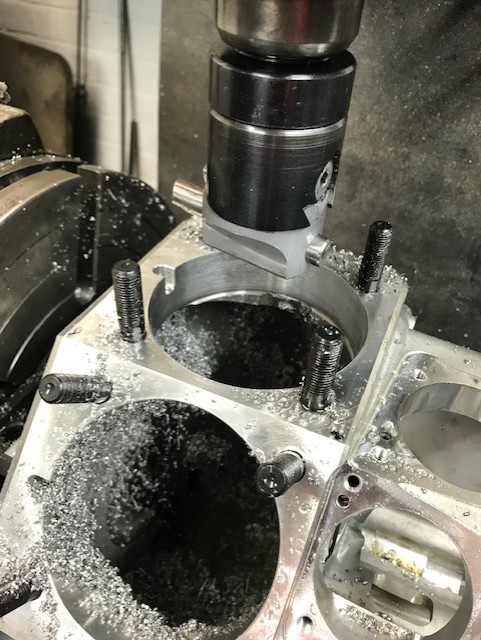
So to kick off, the Ultima 3 5/8 cases are bored out to 4.005" plus/minus 0.002" to accept the Axtell cylinders.
I use a local fabricator/machinist/artisan-welder for all my specialist work. I've been using him for years now; frame repairs/mods, one-off parts, machinework, loads. He's not a harley man, doesn't need to be. First class engineer, thats all.

cases being setup on the mill; clamped on the alternator side to a rotary table, trued-square.
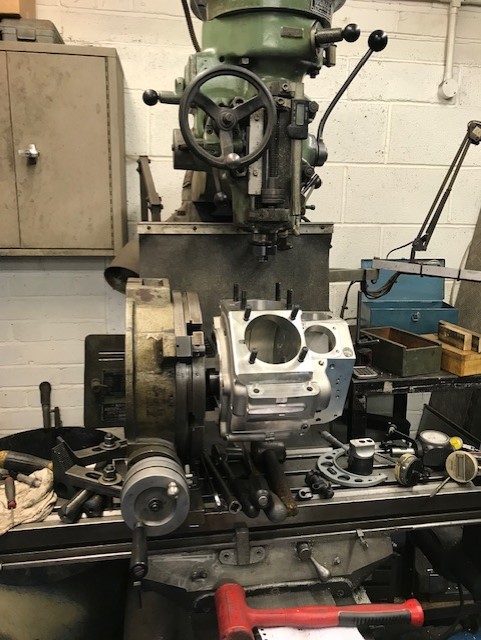
thumbnail_IMG_7359.jpg


cases being checked for trueness prior to cutting.
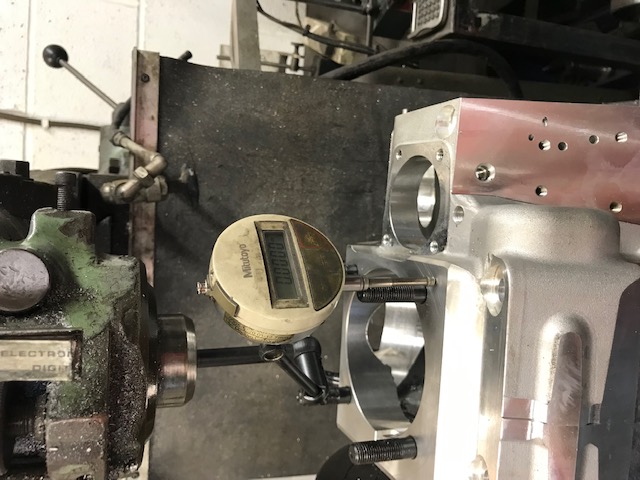
thumbnail_IMG_7369.jpg


the cut
thumbnail_IMG_7361.jpg


the fit
thumbnail_IMG_7376.jpg


one thing when boring out cases to 3 5/8 or more as in this case, is that you break through to the top-centre case-fixing.
with OEM cases, having a long-bolt you can simply cut a relief into the bolt and on assembly make sure you 'align' the relief with the cut to allow cylinder-spigot clearance. Ultima cases implement a cap-head bolt into a blind-hole, so you can't simply relieve it, as it needs to be rotated to insert and not guaranteed you'll end up in the same place after torqueing down etc? To deal with this the plan will be to fit a stud that has been relieved for clearance. A comparable fixing to the counterbored cap-head will be made. Off the cuff, a spacer into the counterbore and an appropriate nut made to suit. Possibly increase the counterbore dimensions; depth/width to allow something in-keeping with the cap-heads. That will be finalised at a later time. For mock-ups, checking clearances that bolt can be left out for now.
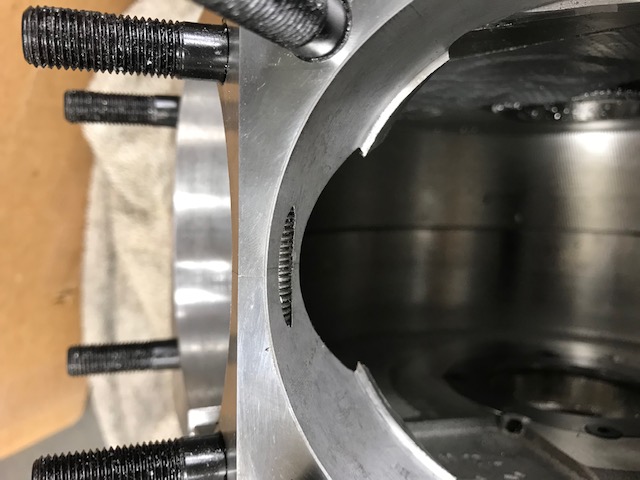
thumbnail_IMG_7378.jpg
 
Wow! I will definitely be following this post. I can’t imagine ever being able to do something like this. Amazing to see how you progress. Good luck and keep the pictures coming. :encouragement:
 
Permission to be very very impressed, its amazing how many brilliant engineers there are in this club and you are definitely one of them
 
I think Somebody in the harley drag racing community developed an answer to the center bolt problem when boring for big jugs i think it involved aviation high tensile steel threaded bar thinner than the stock bolt with top hat bushes inserted into cases either side same id as the bar to stop alignment changing keeping it true hats out with a pair of locking nuts either end one pair locked up and copious amounts of thread locker used then the cases torqued up to spec the other side then second lock nut tightened up and thread locked as they found the loadings on the cases are shared across all the case bolts rather than through one point as-the power stroke tries to push upwards and downwards and combustion takes place above the cases they ran em for a couple of seasons like this before tearing down to replace cranks :unsure:
ps ace thread keep it going
 
watchman, yeah, that style of S&S bolt was initial idea. Simply machine down the area where the cases break through.
i'm sure with a HT-steel bolt it'd be fine, those smaller 1/4" bolts aren't that stressed, plus they're only torqued to about 100 in lbs (approx 8 ft lbs).

i still prefer second idea to fit a stud, lock it in and machine only the area required to relieve the spigots. that way you get maximum material left in that fastner. i don't want to, nor will i drill right through the case to fit a long nut/bolt affair as OEM.

ultima cases have more material in that area compared to OEM cases.
OEM cases only have about 2.5mm of material towards the front cylinder and about 3mm towards the rear. If you took these out to 3.883" for 3 5/8" spigots, it'd break through. At 4" you'd significantly break into that bolt-passage.

OEM Shovelhead near-side (LHS) case
fullsizeoutput_9b9.jpeg


Ultima 3 5/8 cases + 3 5/8 cylinders fitted showing spigots, just enough material on that bolt-passage.
IMG_1510_zps75c6861c.JPG


Due to the more material and 'offset' of that bolt passage.
The rear cylinder spigot area is less affected compared to the front and just breaks into the passage.

rear cylinder spigot 'break-through' on the Ultima case.
thumbnail_IMG_7377.jpg


it looks as if all that is required is to remove the 'thread' in those areas and there will be enough clearance.
But more work required to make somehting better than just a simple 'nut' for the end. only from an aesthetic point of view, but i have ideas on that.

There will be more case-work required, as they need to acommodate external oil-drains, as the 3 13/16 cylinders don't have them. But that will comer later on when a decision is made exactly where to fit them prior to final assembly. But for now, it think thats enough for cases. I'll move onto to something else in this build.
 
moving on to crank motor-shaft and pinion shaft bearings...

cases come with a set of tapered bearings for the LHS motor-shaft and all intents and purposes a correctly sized spacer for correct end-play tolerance. but nothing is assumed correct and everything is checked.
The tapered bearings have to be pressed on, so if that spacer is incorrect, you have the ballache of removing outer bearing again, correct spcaer dimension and replace with new bearing again. repeat if necessary.
you can see this is not acceptable, so some time back i made a tool that allows installation of the bearings + spacer and check tolerance without having to press any bearings.

it's a simple 'test' shaft, slip fit for the tapered bearings to allow it to be bolted up and measured. you can use an old shaft, i'm sure jims or S&S sell one, but easy enough to make and imperative if you are going to this a few times.

constitute parts; test-shaft, end plates + fastner
P1060517.JPG


to get an idea of how it assembles; the end-plates bolt up and draws the tapered bearings together against the spacer in the middle.
imagine the tapered bearings held within their outer-race and the middlel spacer dictacting the amount of free-play, lateral movement.
without the spacer, the bearings would butt-up against the outer-races, having no free-play.
just the same idea as with tapered wheel bearings, requiring the correct spacer for end-play, yeah?
P1060516.JPG


checking end-play; case is bolted down and a pry-bar of some description used to lift the assembly and measure movement.
3 thou' is what your after. you don't want any deflection between the case and dial-indicator reference, otherwise measurement will be unreliable.
no kitchen worktops or picnic tables, yeah?
P1060513(2).JPG


dial indicator zero'd
P1060514.JPG


0.08mm deflection, equates to 0.000314", good enough.
P1060515(1).JPG


the above photos are from when i built my 98", i haven't done this yet to this 114" build.
but it will be the exact same principle. i just wanted to show the procedure for comprehension.

i'm presently recovering from some hand surgery i had last week to correct dupuytren's contracture on a couple of digits.
so i'm limited to what i can do, but doing what i can to keep sane and make some progress?
 
pinion bearings....

pinion clatch.
IMG_8171.JPG


i've have reasonable pinion bearing stuff in my shovel-stash. a selection of aftermarket, eastern/VT etc rollers which i use to ascertain clearance. but i prefer to use OEM HD parts for the final assembly. oem parts don't break the bank at this level and the integrity of the bottom end has to be the best you can get. i'm worth it? i have some oem nos roller-cages, rollers, thrust washers and later oem evo-bearings that can be utilised in the absence of oem rollers or simply for preference?

evo bearing is a pressed steel cage holding the rollers, just big needle-roller bearing. compared to the shovel one that is a machined steel cage holding loose rollers. evo bearings come in two variants; a pair of caged-rollers, similiar to a shovel setup and later variant of a single caged roller.

after discussing with folks that have used evo-bearing on shovel builds. i am looking to possibly utilise the later single caged-roller evo bearing on this build. thoughts are that a single, longer-roller will give better support than a pair of shorter ones? makes sense? but the evo-bearing has one less roller than shovel-cages. so it's negated by having less surface area on the pinion shaft? so jury is out at this stage, but evo bearing is factored into measurements and checks.

a no-nonsense method of sizing pinion-rollers is to use the 'plug-fit' method. here you simply use sets of rollers increasing in oversize until you come to the size that doesn't fit. you then back off a couple of sizes. i measure everything too for confidence and correlation.

i.e.
+0.0002" rollers, easy slip-fit, smooth no binding.
+0.0004" rollers fit. snug, but slip-fit, no binding etc, roll smooth.
+0.0006" rollers do not fit.
so, somewhere between 0.0008" and 0.0011" is your clearance with standard 0.250" rollers.
if you fitted +0.0002" rollers, you'd have 0.0004" to 0.0007" clearance.
hope that makes sense.

here +2 rollers are a tight slip-fit, but will insert correctly all the way in.
IMG_8156.JPG


here, +4 rollers do not fit
IMG_8159.JPG


so, based on above, my pinion clearance with standard rollers (0.250") would be 0.0004" at best. a bit on the tight side, risk of binding in use.
if i used undersize rollers -0.0001", then i'd increase clearance to 0.0006". still too tight for comfort.
ideally i want i.r.o 0.0008" to 0.001", erring on the 'loose' side, but confidently reliable.

trying the evo bearings...
evo bearings, rather than specifying a roller size. come in 'colour' codes and have a chart where you pick the bearing based on shaft + race dimensions. i have a 'green' coded bearing, which has the smallest roller size, and 'white' coded bearing that is the next size up.

Green evo bearing is tight slip-fit, as was the +2 rollers.
IMG_8157.JPG


White evo bearing is too large, will not fit, as was the +4 rollers.
IMG_8158.JPG


So the evo-bearings seem to correlate to the shovel-rollers regarding sizing.
but lets take some measurements to get confidence in what we are seeing.
 
for measurements, i use some nice old moore and wright micrometers that i've picked up off ebay over the years for not much money. resolution is 1/10000" and necessary. a 'thou' won't cut it.
when i built my 98, i had access to some very nice measurement gear with work at the time; bowers 3-point bore guages. i don't have that anymore and it's economically prohibitive to buy anything like that or other industry standard measurement gear for personal, non-profitable use.
i don't rate any 'new' chinkwainese 'affordable' measurement gear. you can get classic precision instruments as good as the day they were made for less money than new crap. if you're thinking of investing, it's well worth it. you don't need much.

i have a set of imperial slip-guages that i use to adjust the micros' and set them to a base-measurement. if i'm taking a 1.2500" measurement, i'll setup 1.2500 with slip-guages and adjust the micro to read 1.2500", like wise with whatever else.
interestingly, this complete boxset of slip guages were pulled from a skip in a scottish shipyard i was attending during a refit period.
unbelievable. what a find!
there was also a number of other brand new quality handtools thrown in there too. beggers belief?

anyway - slip guages
IMG_8119.JPG


1" + 0.75" guage.
when those clean/dry slip-guage faces are brought together, they 'grip' each other and can you can drag them stuck together.
i do this to get confidence the faces are clean and 'flat' against eachother, no crap in between, however small.
IMG_8148.JPG


micro adjusted to 1.7500".
the horizontal lines above the main scale are the 0.0001" divisions.
IMG_8149.JPG


using a telescopic-guage i take the pinion race I.D.
measurements are repeated at 45deg intervals and through the depth of the race to get an idea of how 'round' the race is.
here it was fine, some minor variance only, detectable by the friction required to 'rock' the telescopic through it's horizontal.
IMG_8112.JPG


after placing the telescopic in the jaws of the micro and adjusting for correct fit, i get 1.7501" I.D.
you can see the main scale is beyond the zero (1.7500") and the horizontal 0.0001" division is aligned.
IMG_8160.JPG


after repeating numerous times in various places within the race, with negligible variance i conclude this is my pinion race I.D.
1.7501"
now move onto the pinion shaft.
 
same deal here.
1" + 0.250" slip guage.
IMG_8150.JPG


zero'd at 1.2500"
fullsizeoutput_aa4.jpeg


on the pinion
IMG_8152.JPG


resulting measurement.
you can't see it, but the main scale was under-zero, implying less than 1.2500".
here you can see the '8' is aligned on the 10,000ths scale.
so here measurement is 1.2498"
IMG_8153.JPG


again measurements on the pinion-shaft are repeated for confidence.
so i have...
1.7501" on the pinion race I.D.
1.2498" onn the Pinion-shaft O.D.
thats a difference of 0.5003"
this correlates with those +2 rollers being a tight slip-fit; 0.5004" plug into a 0.5003" hole.
and the +4 rollers simply being too much; 0.5008" plug into a 0.5003" hole.

for additional confidence, i check the size of the rollers.
in the past i've made mistakes and been using rollers to a different size of what i thought, bagged up wrong.
 
pinion rollers...

setup the micro as before with 0.250 slip-guage, you get the idea now?
IMG_8161.JPG


here the +2 rollers will not fit through the measurement-faces of the micro as set to 0.2500"
IMG_8168.JPG


adjust the micro to 0.2502"
fullsizeoutput_aaa.jpeg


and they nicely slip through, with just a hint of resistance. sweet.
IMG_8169.JPG


same is repeated with the +4 rollers.
will not pass with micro set to 0.2502"
and pass nicely with micro set to 0.2504"

ok, so far so good.
i don't have photos, but i did the same with the evo-rollers and concluded the following measurements.
'Green' bearing rollers measured between 0.2503" and 0.2504", depending on what 'friction' you took passing the bearing through the micro-faces.
'White' bearing was 0.2504" to 0.2505", same deal.
this again, nicely correlated with the fit i experienced with the evo-bearings.

to conclude this chapter. i have i.r.o 0.0003" to 0.0004" clearance on my pinion.
not enough, whatever route i take.
this means i have to lap the pinion race to increase it's size to get what i want.
i have the lap tool and cutter, so no big deal, but it will have to wait to do this.

IMG_8047.JPG
 
Last edited:
Wow. I could never contemplate doing anything like this but I'm glad somebody is and a big thank you for taking the time to put it all up on here.
 
Nice job good kit too with good methods some good finds in the skip makes you wonder how much kit gets binned when a factory closes this thread is one to keep running if you can its enlightening to see rather than catalogue tat just being bolted on (y)
 
i don't think any of this is difficult or beyond most people?
it's just methodical, implementing well known, tried and tested practices, some ingenuity, creativity and just the desire to do so.

not all have the desire or inclination to do this sort of stuff, but if anyone even considered building/reconditioning their own engine, i couldn't express it enough for them to do so. with a little investment for instruments and tools it easily acheived. oh, and not fogetting the club's tool lending scheme and support on here. it's a no-brainer?

ok, some aspects you can't likely do, like machining. but like me you get someone, reputable, reliable, conscientious etc that can do it for you.
i am a firm believer in distribution of wealth, spend locally, support business etc etc. but there is a lot of rubbish out there?
90% of the time i hear problem stories with work being done in bikeshops/machineshops. especially with the present popularity in choppers, bobbers, cafe-racers. the whole hispter-cool, biker-chique thing?

anyway, lets get back on track.
so, i've worked out my pinion bearing clearance and the fact that i have to lap the pinion-race to increase it's size to get the correct clearance.
somehting that will be done later. i can still assembly the engine for other checks and measurements, so lapping pinion is even possible prior to final build. all good.
I'll check the motor shaft bearing end-play, next time cases are out, they're presently wrapped-up and tucked away in the workshop.
So case-crankshaft-bearings are in hand.

and now for somehting completely different......
the very start of this journey, my correspondance with r&d machine required specification of cylinder measurements. The 2nd generation axtell cylinders are made to order, from cast-iron blanks i guess. so you can have whatever you want to suit stroke, c:r, quench whatever.

i started with creating an excel sheet with various parameters that allowed me to play around with stroke, combustion-volumes, compression rations, squish-bands, gaskets, notes, camshaft specs a whole gamit of parameters, obtain cylinder lengths to help me where i want to be.

jzk excel calculator
Screen Shot 2023-11-19 at 10.00.11.png


so eventually i decide on where i want to be.
i opted for a cylinder length that could work with both a 4.75" and a 5" stroke, as at this stage i was yet undecided as to whether repurpose my 4.75" crank from my 98" or start fresh with a 5".

all this leads on to the main event here....
pistons that come with the cylinders are forged units, as you'd expect and manufactured for axtell by JE, a well known piston manufacturer.

axtell/JE pistons
1.295" compression height
53cc dome
weight is irrelevant at this stage.
IMG_7939.JPG


problem (for me) with these pistons is that 53cc dome, thats pretty big, obviously to help get that high C:R required for long duration, late-cams, high-rpm work. everything i do not desire or aim to operate in.
couple that with the fact that as stroke increases, so does C:R. this is because swept volume increases with respect to combustion-volume.
at 4.25 stroke C:R rendered with these pistons would be 11:1, as a mechanical compression not that high in itself, resulting corrected-compression would be purely cam-dependant and conclusive on where you want to operate?

but with a 5" stroke, C:R is more like 13:1. factor in operating region is firmly planted in the low-mid-rpm range; street-mannered and touring biased, which would require an early-cam. it's far too high. a recipe for knock/pre-det etc.
by 'early', i mean a cam that closes the inlet valve 'early' on after bdc.
ideally i'm looking at a mechanical compression no more than 10:1 really, corrected i'd end up about 9.5:1, giving a cylinder psi of about 180psi with the cams i'm looking at.
plenty.

so have to do something about that dome. when dealing with 3 13/16th stuff, you can't just pick parts. like a buy a piston with suitable dome. there is very little to no-choice. what is made is what you get. there is more flexibility with flat-top pistons in this bore, but hemi very little.
you can of course get bespoke pistons made. but usually a minimum number is required and cost is simply prohibitive. i guess you could 'cast' your own piston easy enough, but then it wouldn't have the desired properties, i.e. forged. possibly machined from forged billet? regardless it all gets very expensive. and less interesting.

now, the easiest way would be to simply calculate how much material has to come off the top of that crown to get the target dome-CC and mill it off. simple enough. a failing of mine, is i tend not to do things easily. i over-think, over-complicate and over-engineer stuff. i think it's just an affliction? it's common with people who dick about with stuff?

anyway, to support my affliction the piston dome is preferable to be as low as possible, so not to impede flame-travel. when designing combustion-chambres there can be some benfits to a high-dome, but generally speaking lower is better, as is minimised sharp-corners, edges etc. anything that can create a hot-spot or disrupt flow.
so a nice spherical-dome would be better, with the desired amount of volume to get target compression.

first we have to obtain the dimensions of a dome of specified volume. if you imagine the 'cap' of a hemisphere with correct volume.
this is what we're after; that 'cap' dictated by 'r' & 'h'.

Screen Shot 2023-11-19 at 10.48.53.png


my target dome-CC is 28cc, that will give me a C:R of 10:1, with the camshaft(s) i've identified.
normally you can simply 'tweak' your C:R by adjusting the compression-height of the pistion within the cylinder.
easily achieved by adjusting the height of the base gasket the cylinder sits on.
but this engine will be implementing a 'squish-band', more on that later, but C:R is not an easily 'adjustable' parameter.
easy(er) if we want less C:R, but not if more is required.
so we need to pick a value, work to that and not fuck it up.

the piston will obviously get machined, it is yet decided whether it gets done on a lathe or mill. there are pros and cons to either method.
but we only have one chance, right, otherwise a massive compromise (too-low C:R) or a new set of pistons and try again.
could get expensive with 500 quid a pop for pistons?
to minimise chance of messing this up, is where it gets creative and fun.

plan is to cast pistons copies out of resin, so i could play around with acheiving the correct dome. obtain dimensions from that model. paul my machinist could then practice machining dome on further resin-copies, implementing various techniques. when confidence is obtained a final 'draft' machining carried out on an aluminium slug to obtain cutting-tool 'behaviour' on the actual piston compared to polyester-resin. our concern here was behaviour as it passes valve-reliefs.

so to the fun part.
i made a mould to get most of the piston skirt and crown. a simple box is suffice.
the box is made from that corrugated-plastic card mount stuff and just hot-glued together
a light coating of mould-release to help, though it's not really required due to the plastic-card and ally-piston.
liquid silicon is used to get the pattern.

IMG_8064.JPG


mix, pour and let it set over a day or so to be sure.
the liquid silicon is white, but the hardner is red to give you an indication it's all mixed properly.
pot life it plenty, you don't have to rush.
silicon is 'condensate' cure, it doesn't require a vacuum to get rid of air-bubbles as some silicon does.
but would be best if critical moulding is required.
given that fact i only want to really capture the piston top, air can't really be trapped there pouring bottom-up, so expected to be OK.

IMG_8067.JPG


fingers crossed it all come out ok?
 
I think Alex at fast lane may have the formula for the calculation for the dome as he uses it in his head working and may be able to give some valuable input as to redoing pistons and heads ect to keep compression in a sensible range for pump gas (especially in some parts of Europe when travelling) and giving the starter an easier time (y)
 
with the boxing removed
IMG_8072.JPG


in order you get the piston out, have to use a scalpel and cut into the silicon on one side.
use a zig-zag cut, stretching out the cut as you do it.
the zig-zag helps it return and hold original shape, as opposed to a straight line cut, that could slip i guess?

piston removed.
result is excellent.
a few air bubbes in the ring-grooves, but that doesn't matter.
crown/dome is what is imporant and that is perfect.
IMG_8073.JPG


resultant resin copies.
IMG_8082.JPG


so next, i make a template based on a 29cc dome calculated using the formula as shown earlier.
the base diameter of the dome is constant, what changes with volume is the height of the dome and the orginating 'radius' of the hemisphere that results in the 'cap' you want.
the 'arc' of the required dome is cut into a piece delrin sheet and i use that as a guide.
i basically use a 80grit flapwheel in a grinder and shape the dome, checking often against the template.
IMG_8094.JPG


once i'm happy with the result, i have to 'cc' it to check what volume i actually have. i'm expecting less than calculated due to the valve reliefs.
so 29cc should end up a couple of cc less at 27, where i want to be.

this process took a few attempts. at first, with the above copy it came up too low at about 23cc. i did not expect it to be that different, but i guess at this stage all hand-worked, empirical errors can be significant. the surface area of the dome is in the region of 30cm^2, so a height/depth of only 0.33mm will result in a 1cc deviation.

what i did is cut a new template for 32cc, added body-filler to the dome and re-shaped it. i used the template as a sort of scraper, rotating it centrally to 'shave' off excess filler. i then added skims to get it closer to the arc. it wasn't perfect, but close enough for this stage.

i 'cc' it in the cylinder to check actual volume, my 32cc dome actually measures 29cc, i sand a little off the dome at high-spots and make it as 'uniform' as i can. i eventually end up with 28cc measured volume.

for cc'ing the pistom dome, i first place the resin-copy in the cylinder placed with top-edge at a depth of 13.59mm.
with a bore of 96.79mm that gives a cylinderical volume of 100cc.
it's greased around the edge to seal within the bore and i greased the top of the piston to prevent the talc-based filler absorbing any water.

resin-copy placed and sealed in cylinder.
IMG_8146.JPG


i nowhave to fill the void with fluid to obtain the actual 'cc'.
the difference between my 100cc cylinderical volume and actual will be the piston dome.
 
Back
Top