You are using an out of date browser. It may not display this or other websites correctly.
You should upgrade or use an alternative browser.
You should upgrade or use an alternative browser.
Big Inch Shovel - Build Thread
- Thread starter jayzedkay
- Start date
jayzedkay
Club Member
no really progress any further with the build as such,
stage i am at now is waiting for pistons to be machined, then i'll have their weights, then i can balance the crankshaft.
it can then start to get final assembly. bottom end anyway.
crankshaft balancing will be a new venture for me.
some consider it a black art, but not me.
i conclude follow simple procedures, be methodical, accurate and it's not that big a deal.
it ain't rocket-surgery.
i do have x3 crankshafts, inlcuding the unit for this build to be balanced.
various sets of pistons, rods etc. so i could have a 'practice' with the others to some capacity.
at least everything upto the stage of drilling wheels?
anyway, after some research into either making a balancing kit and buying a kit, i opted for buying for simplicity.
have the S&S masters balancing kit covering 5-piece cranks.
i thought i'd elevate the stand by adapting it to take knife-edge discs mounted on bearings.
i know of builders that take this approach for reduced friction, i like the idea of it and the mod is completely reversible.
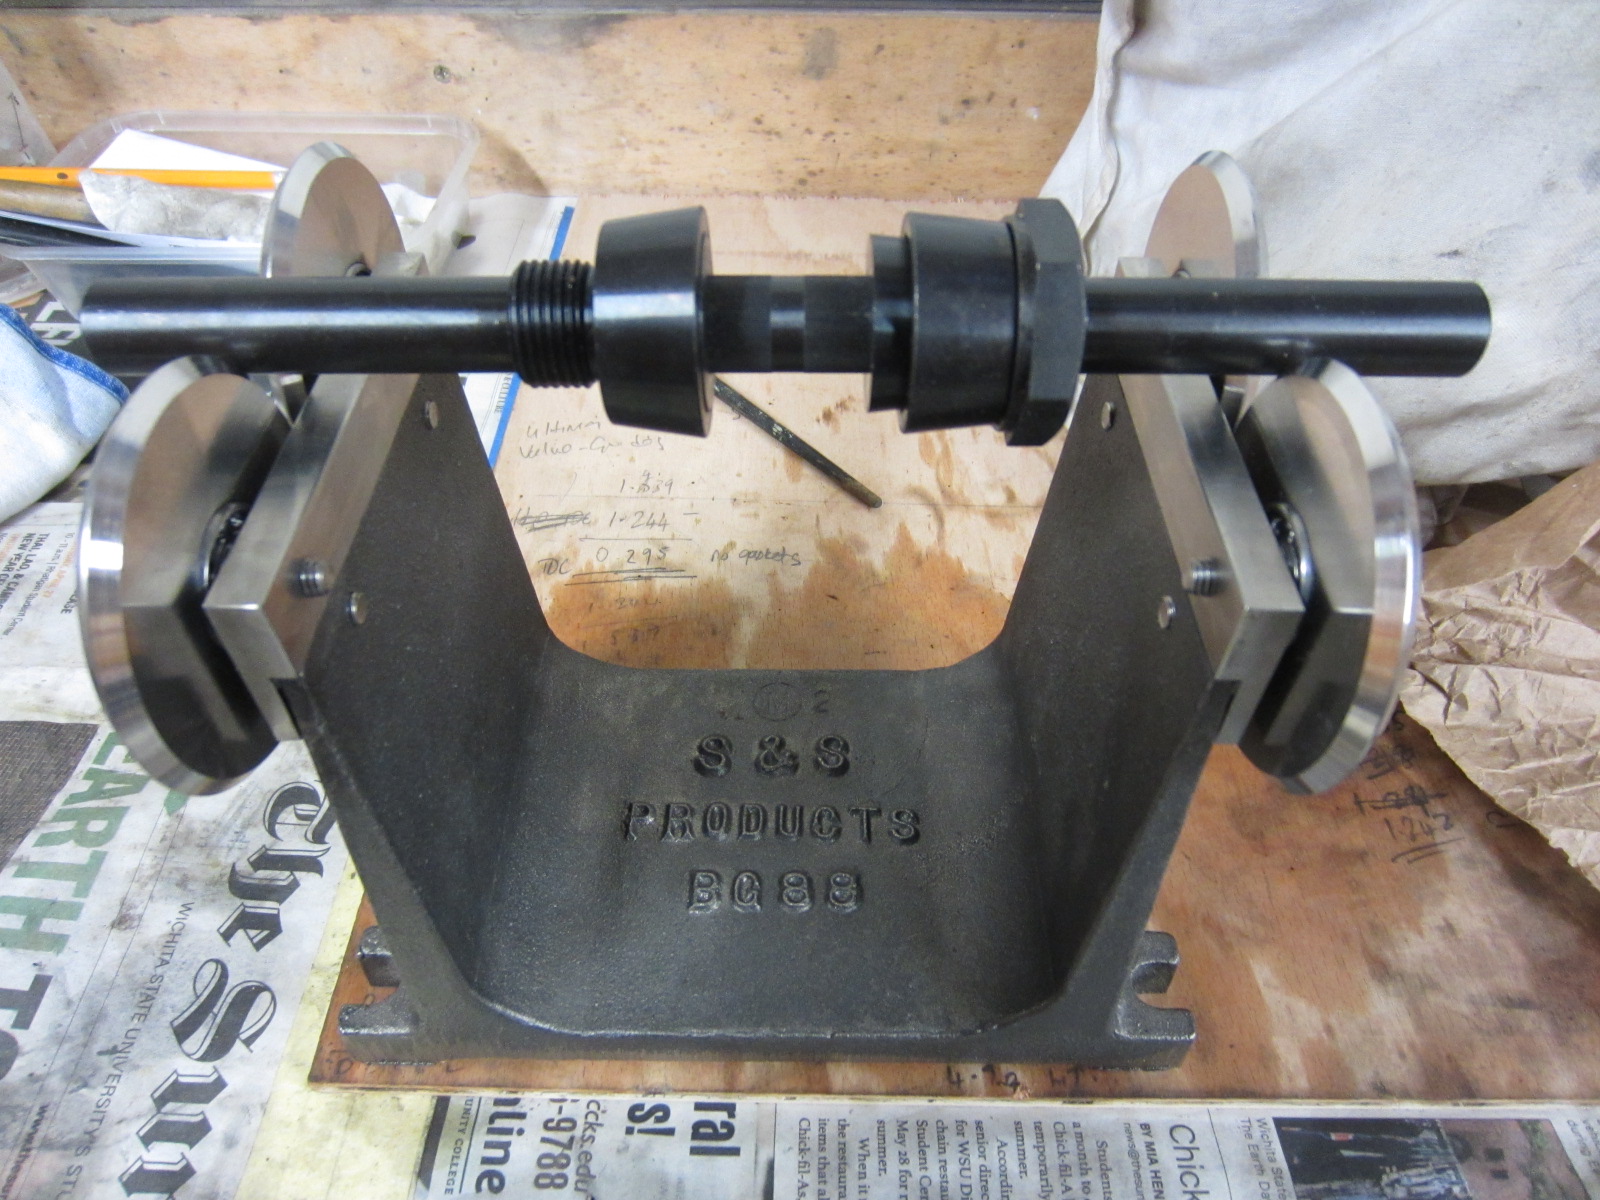
i had some stainless blocks made with a rebate cut in them so they sat ontop of the flat-edge of the stand.
the uprights of the stand have a taper on them, so i 'shimmed' the blocks to get them vertical.
in time, i can mill teh stand to remove the taper, butthe shimming works fine.
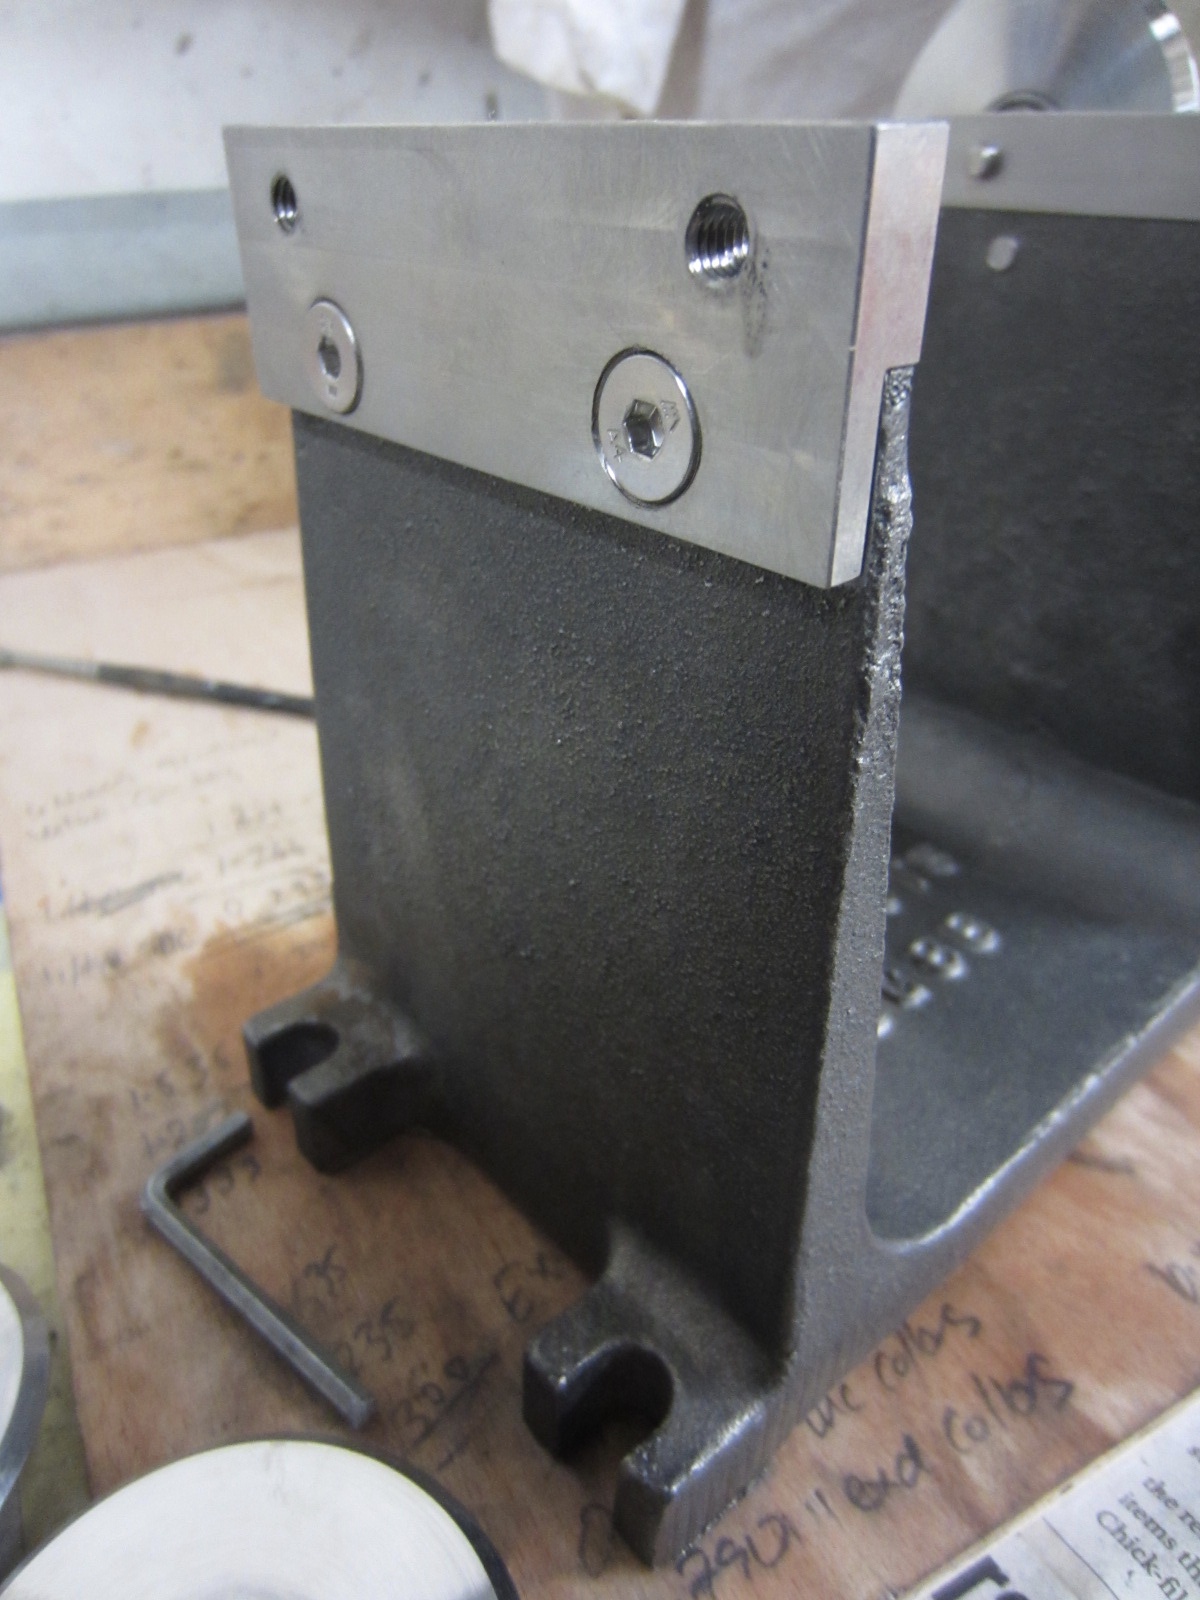
i drilled and tapped the bolcks and stand where required,
put countersunks in for the mounting screws etc
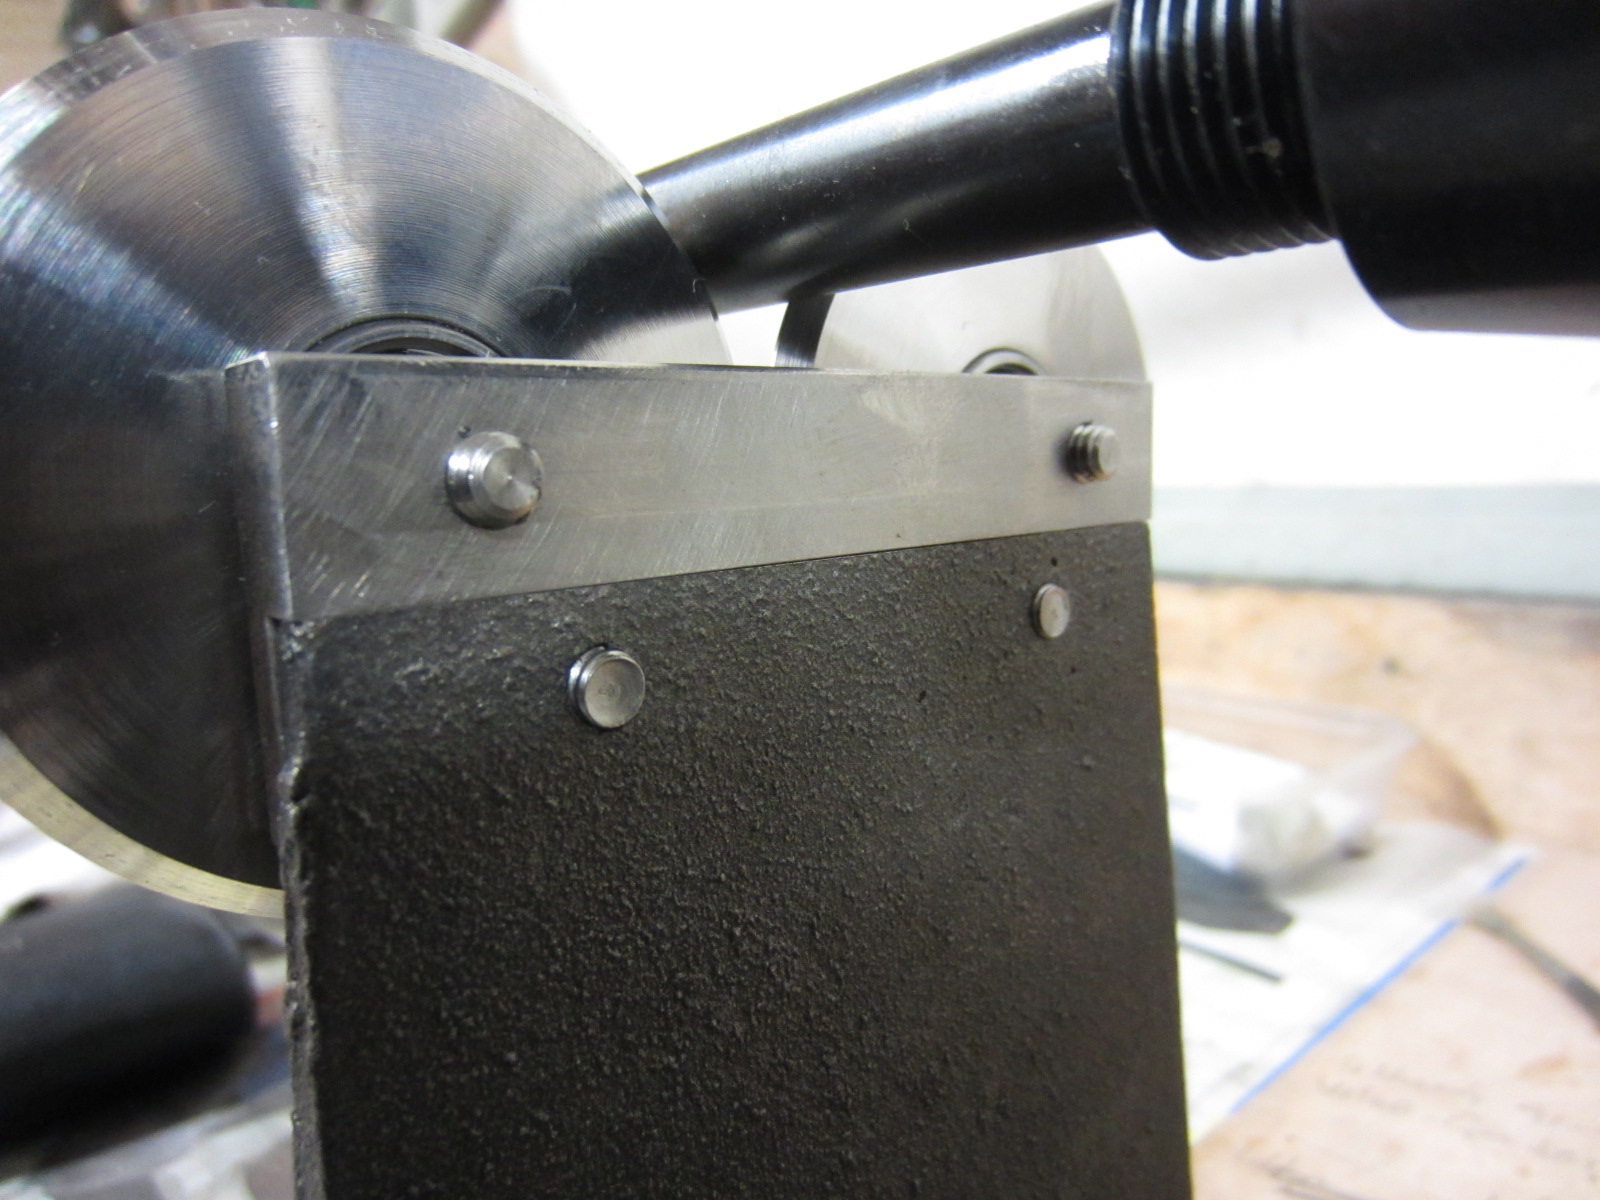
the discs take small bearings, C3 clearance and i popped out the seals and degreased them for minimal resistance to turn.
shoulder-bolts hold them in place. bearings and shoulder bolts are a slight slip-fit, so i smeared a little loctite bearing retainer to hold things firm.
they spin pretty good. surprising how long they spin for.
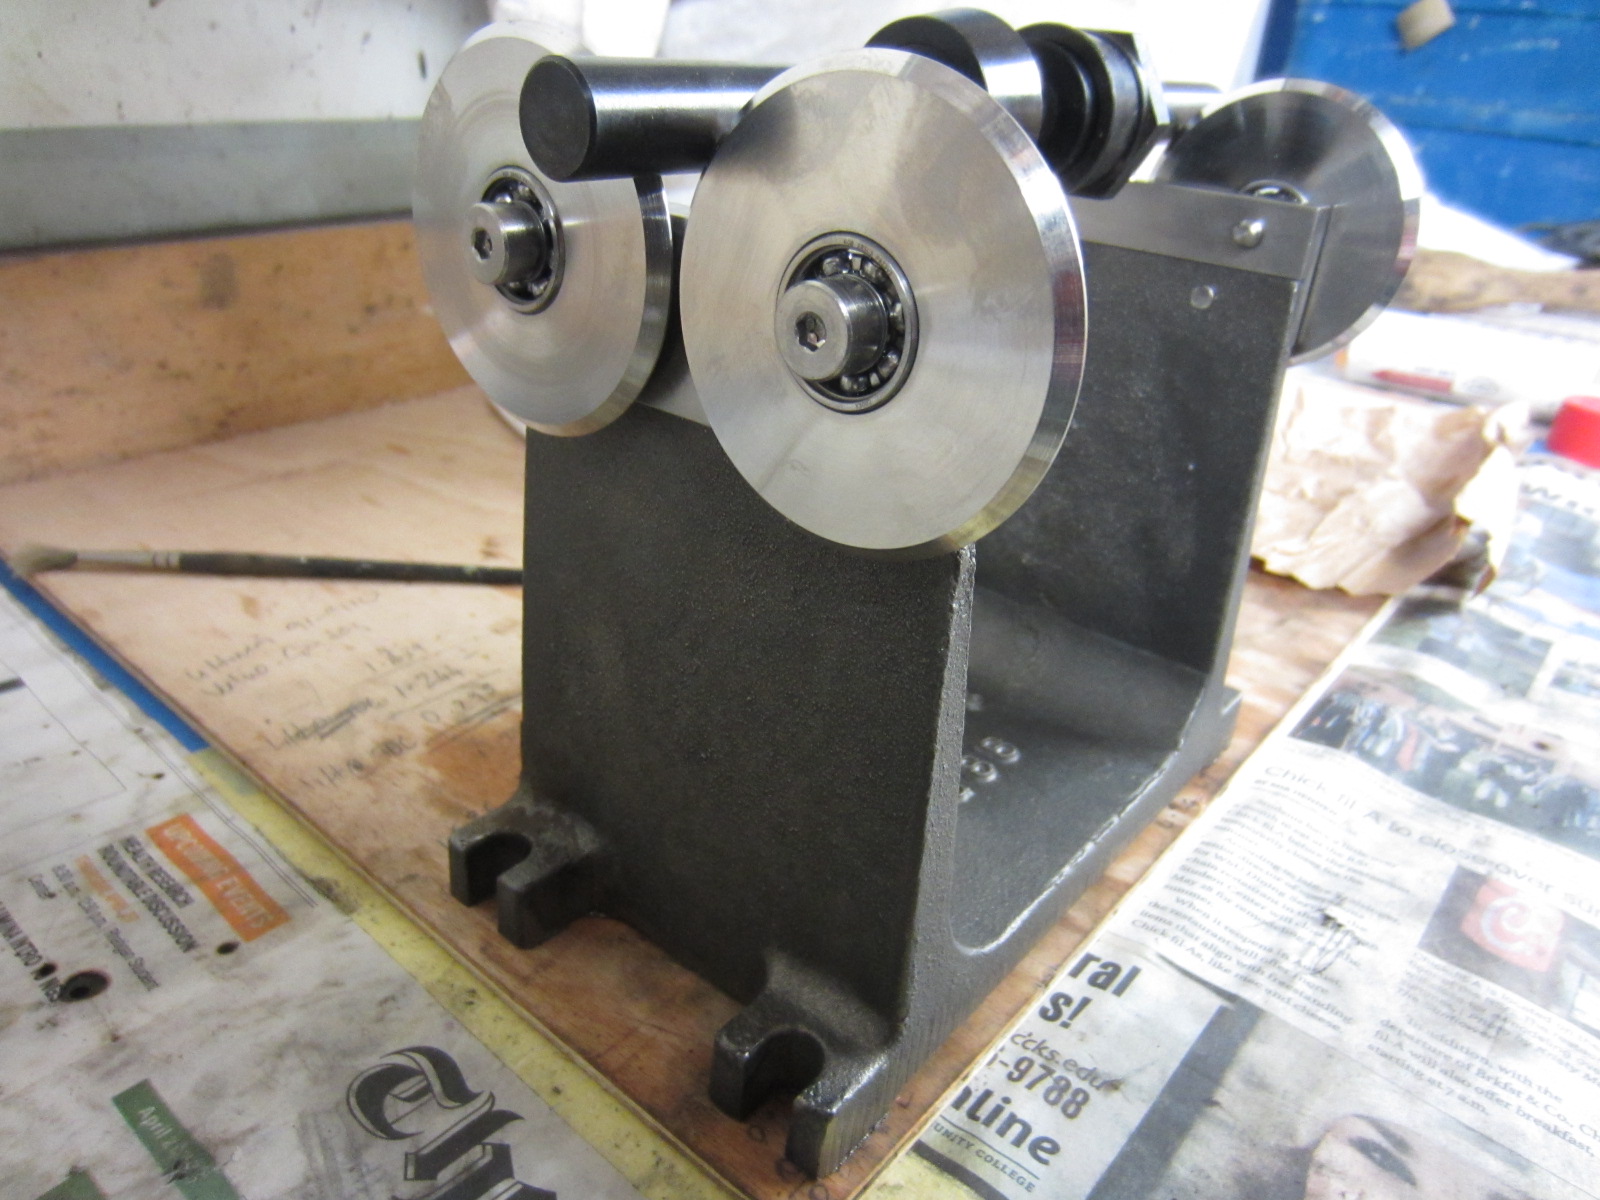
you can either use the balance-shaft you bolt to a flywheel, as shown above.
or if the wheel has a pinion/motor-shaft fitted and you don't want to remove it.
you can fit an adapter that screws onto the shaft and a counterweight to the adpater.
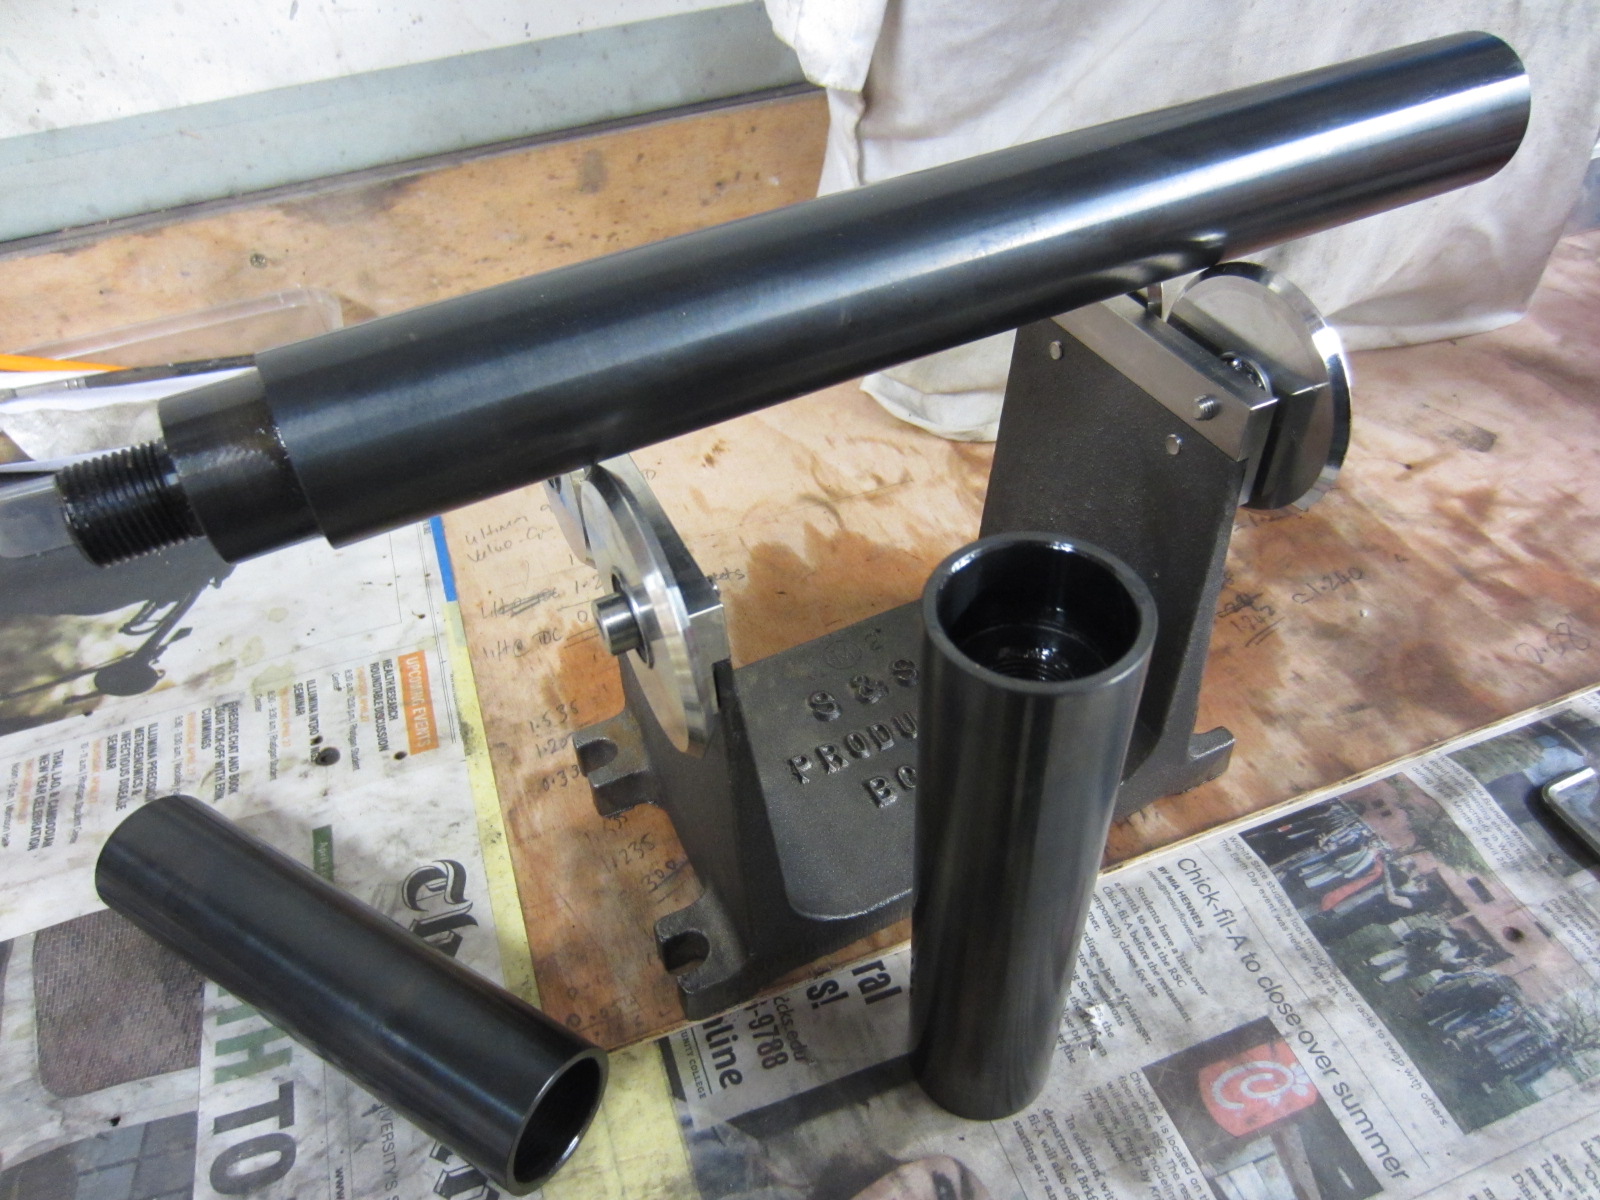
here is the counter-weight on the stand with the shaft-adapters.
the adapetr screws on to the end of the counter-wight and the flywheel hangs over the side,
as opposed to in the centre, as when using the normal balance-shaft.
thats it really for a while, i'll update as and when.
cheers.
stage i am at now is waiting for pistons to be machined, then i'll have their weights, then i can balance the crankshaft.
it can then start to get final assembly. bottom end anyway.
crankshaft balancing will be a new venture for me.
some consider it a black art, but not me.
i conclude follow simple procedures, be methodical, accurate and it's not that big a deal.
it ain't rocket-surgery.
i do have x3 crankshafts, inlcuding the unit for this build to be balanced.
various sets of pistons, rods etc. so i could have a 'practice' with the others to some capacity.
at least everything upto the stage of drilling wheels?
anyway, after some research into either making a balancing kit and buying a kit, i opted for buying for simplicity.
have the S&S masters balancing kit covering 5-piece cranks.
i thought i'd elevate the stand by adapting it to take knife-edge discs mounted on bearings.
i know of builders that take this approach for reduced friction, i like the idea of it and the mod is completely reversible.
i had some stainless blocks made with a rebate cut in them so they sat ontop of the flat-edge of the stand.
the uprights of the stand have a taper on them, so i 'shimmed' the blocks to get them vertical.
in time, i can mill teh stand to remove the taper, butthe shimming works fine.
i drilled and tapped the bolcks and stand where required,
put countersunks in for the mounting screws etc
the discs take small bearings, C3 clearance and i popped out the seals and degreased them for minimal resistance to turn.
shoulder-bolts hold them in place. bearings and shoulder bolts are a slight slip-fit, so i smeared a little loctite bearing retainer to hold things firm.
they spin pretty good. surprising how long they spin for.
you can either use the balance-shaft you bolt to a flywheel, as shown above.
or if the wheel has a pinion/motor-shaft fitted and you don't want to remove it.
you can fit an adapter that screws onto the shaft and a counterweight to the adpater.
here is the counter-weight on the stand with the shaft-adapters.
the adapetr screws on to the end of the counter-wight and the flywheel hangs over the side,
as opposed to in the centre, as when using the normal balance-shaft.
thats it really for a while, i'll update as and when.
cheers.
jayzedkay
Club Member
more dickin' about today.
cometic advertise customs gaskets available in various materials and numerous thicknesses.
i approached the US via theor website and got no response.
so, via cometic uk, who i came across whilst googling. i ordered 32 thou' and 27 thou' gaskets for flexibility.
27 is what i really wanted, 32 was backup.
cometic uk, came back and said they (cometic US) don't do 27 in copper. They do advertise it though, usual bullshit.
by the way, cometic uk was good to deal with, just a shame the US didn't hold true.
so, anyway, i made my own. cometic, schmometic.
bought some 0.7mm copper sheet, advertised as 99% pure (softest).
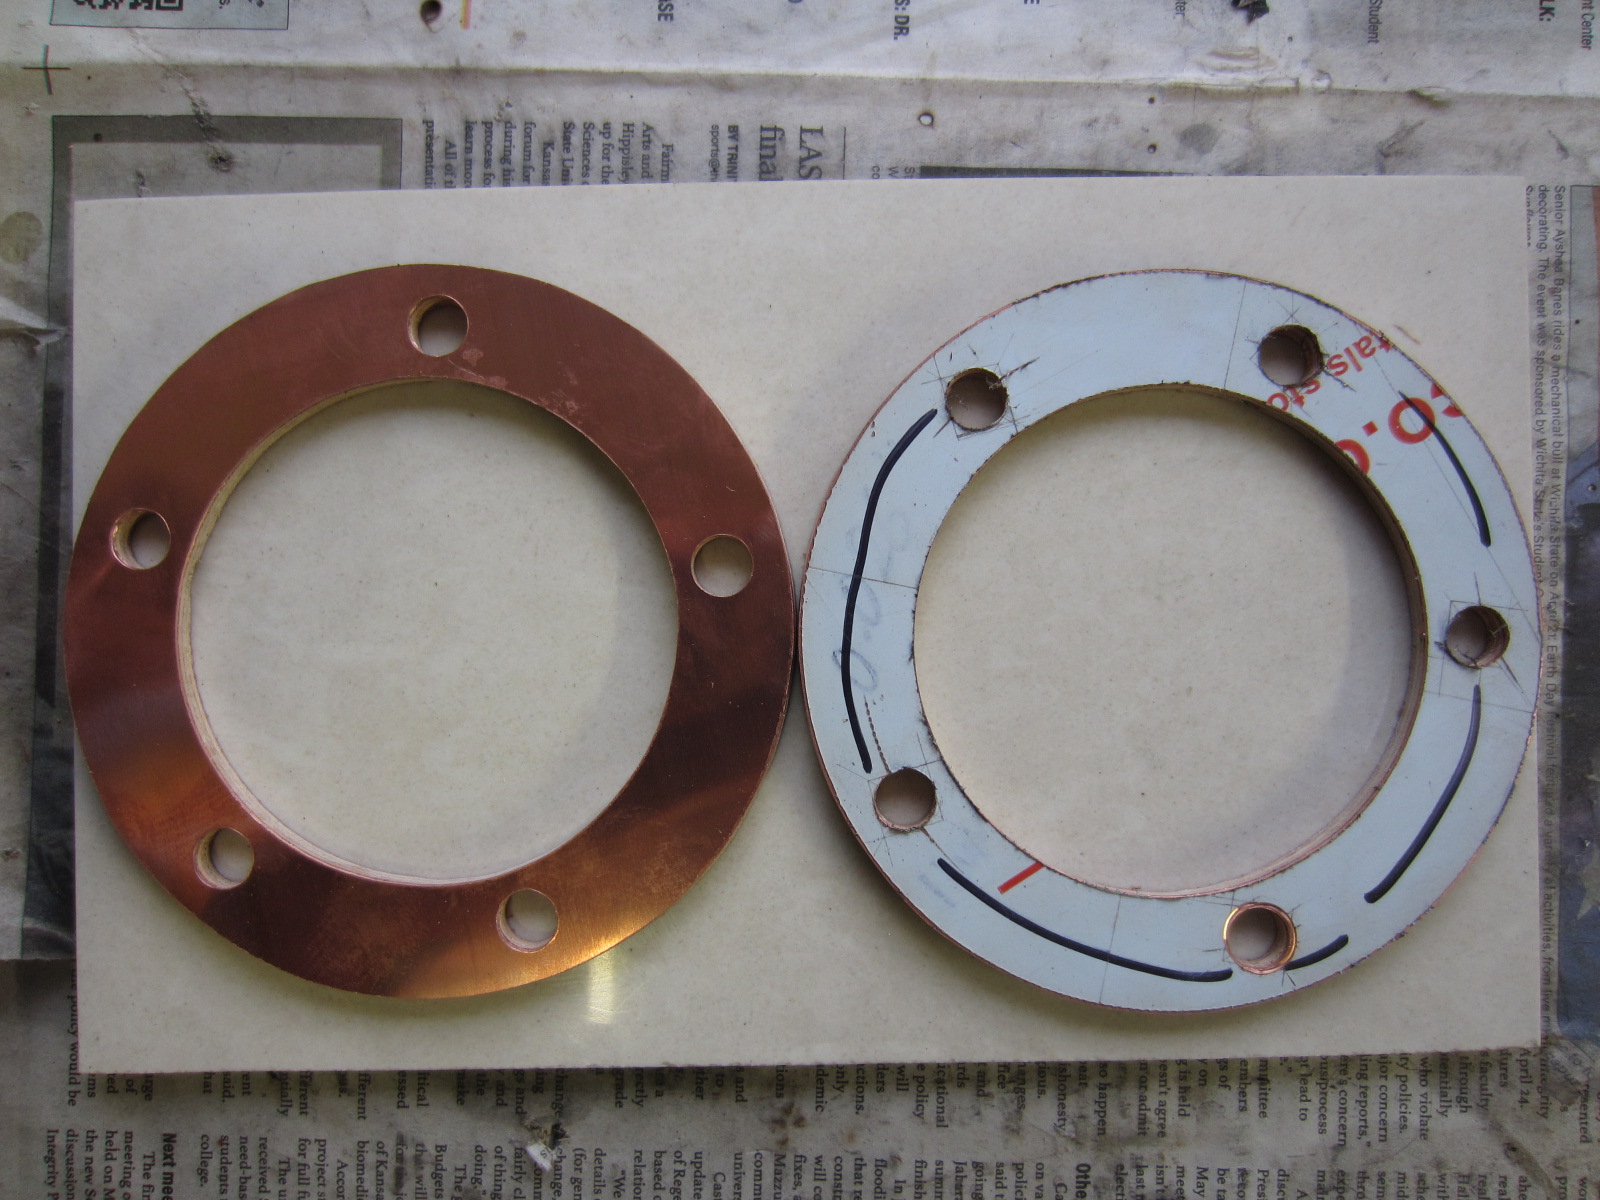
using some 3 13/16th existing gaskets i have, measured up and marked out the plate.
i glued the plate to a piece of 6mm ply to aid handling it and help keep it flat under machining.
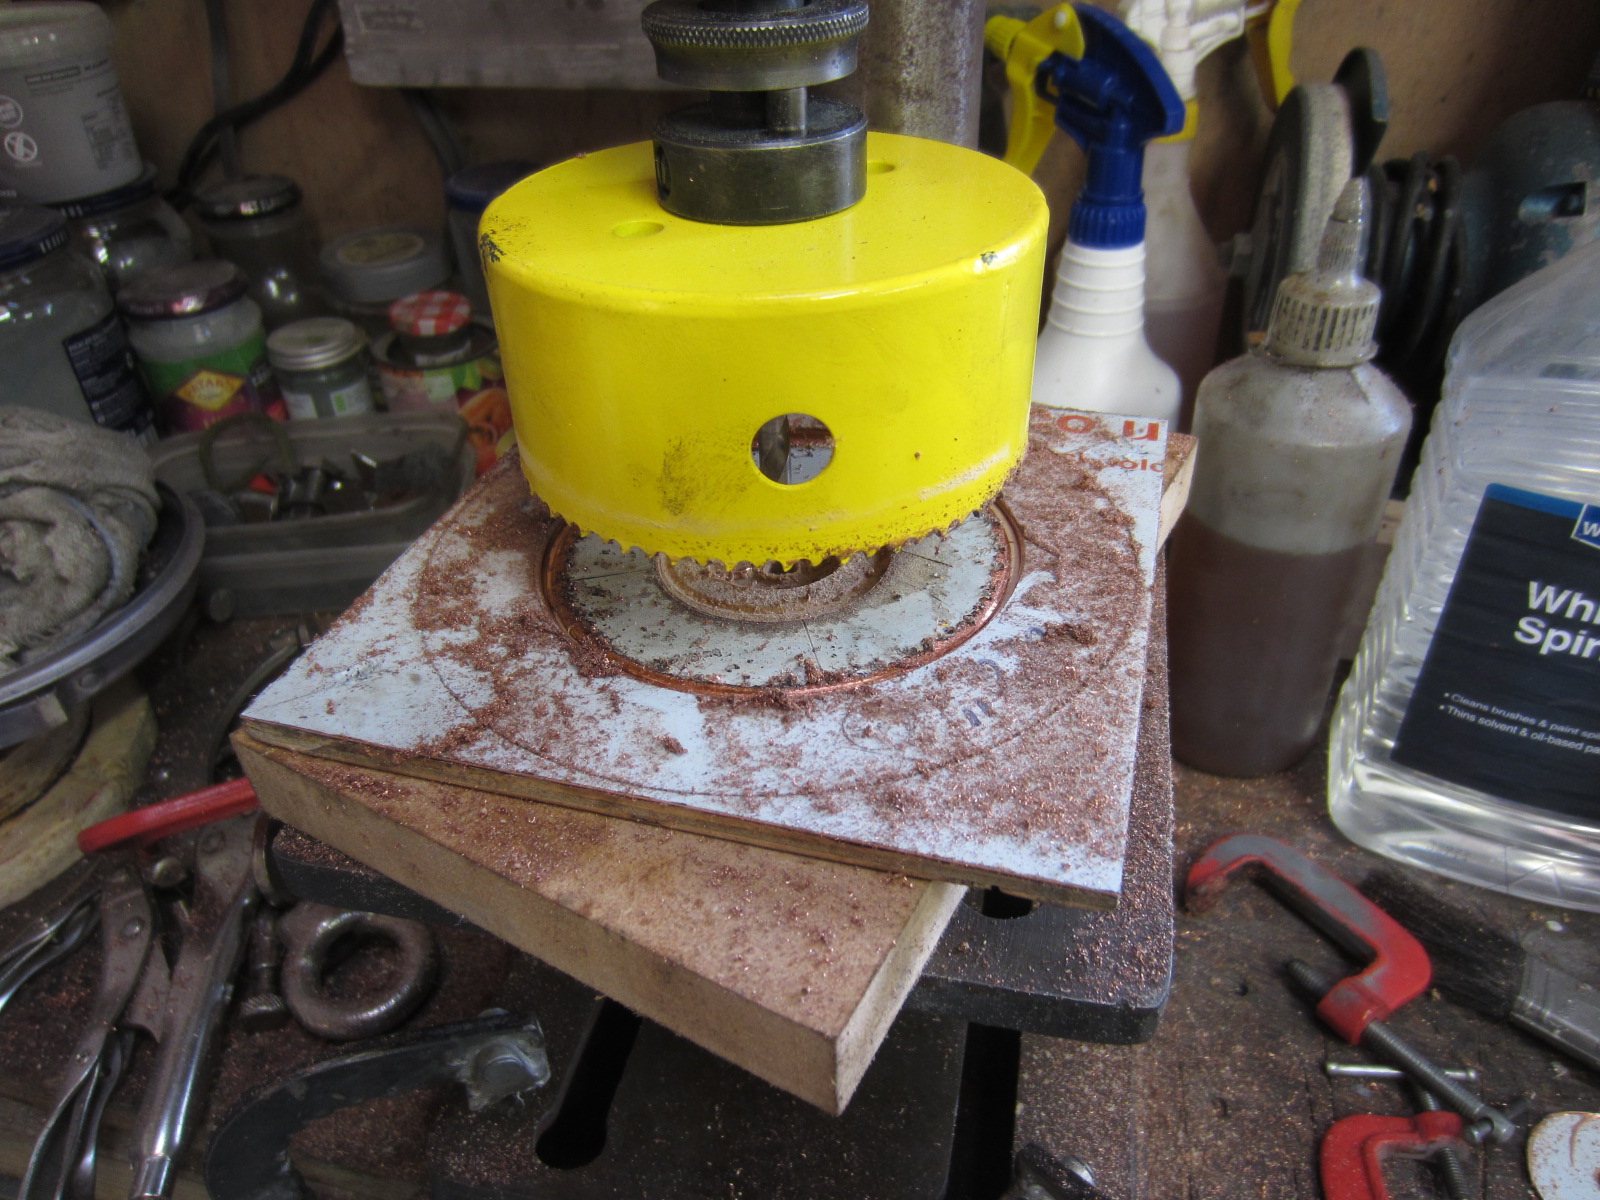
i simply started by cutting out the centre with a 98mm hole-saw, 100 to 101mm (100.64) is the target size, so bit of room for final finishing.
obviously i had this all clamped down, clamps removed when photo taken.
this was on my little chinese drill-press. its really weak, it was slow going, too much pressure and it would simply stall the motor.
i'll be glad when my alpine mill/drill is setup.
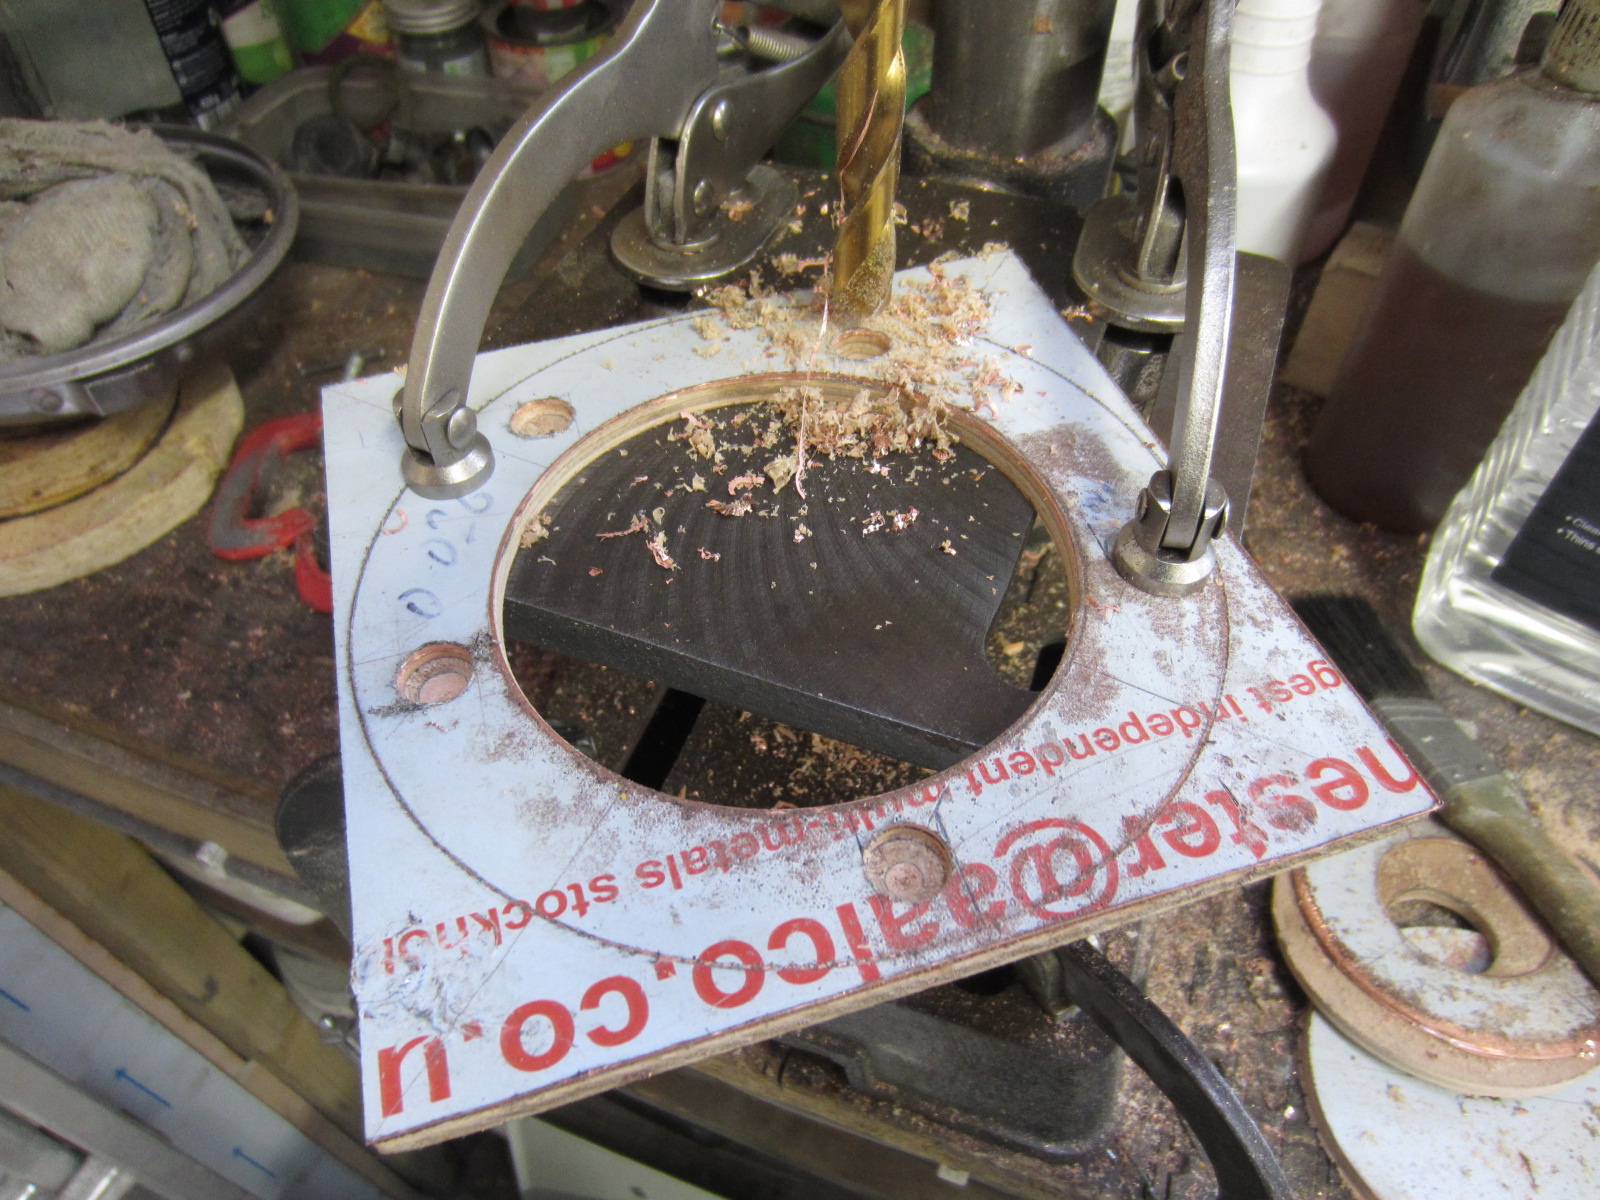
drill out the bolt-holes.
no photo of process, but i then filed the I.D. to correct size.
used a cutting-wheel to remove excess plate from around the edge.
then finally a flap-disc to shape the O.D to size and concentric.
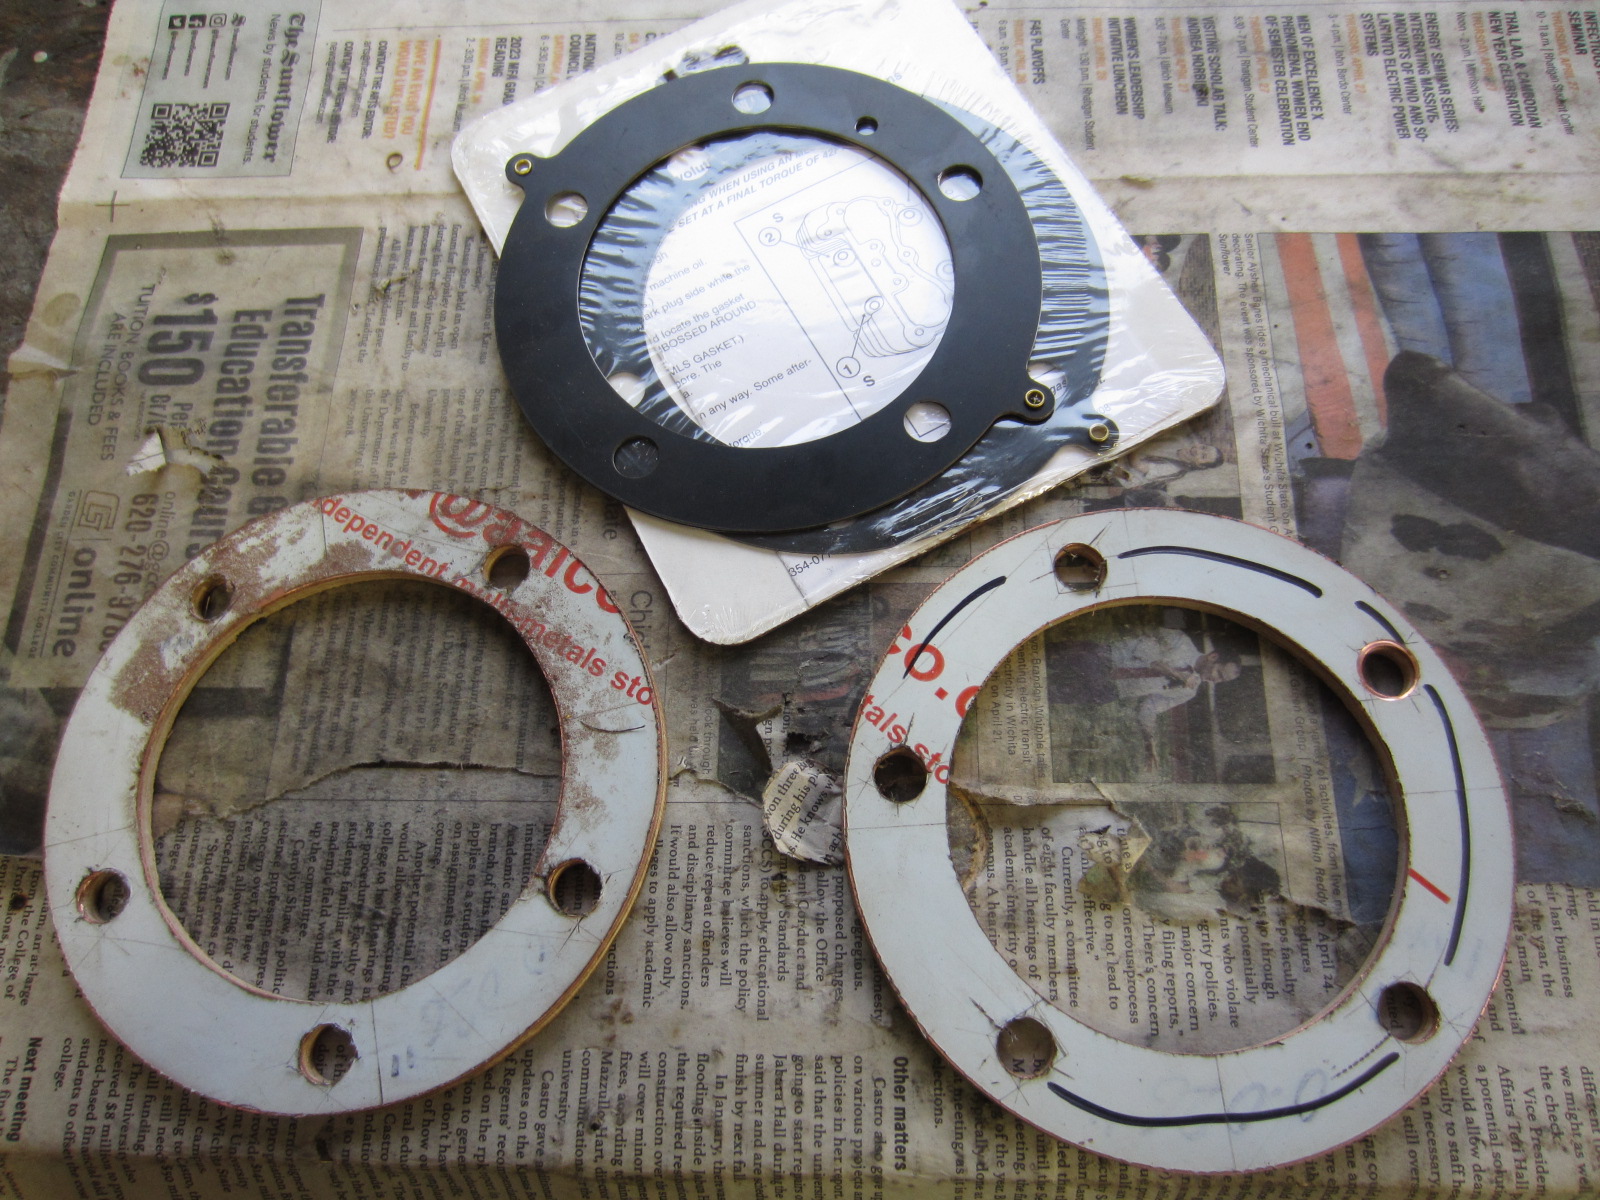
peel off the protective coating and de-burr/reface the copper on some emery with oil. 240 grit and then 800 grit.
i used a polished porcelain tile offcut from recently doing my bathroom as a flat surface.
to remove the glued plywood in order to resurface the other face.
i soaked some kitchen towel in acetone, wrap around the piece, then wrap in kitchen foil.
the foil prevents the acetone evaporating and contain the fumes that quickly break down the glue.
cup of tea later, they fall off the ply sheet.
final resurface, jobe done.
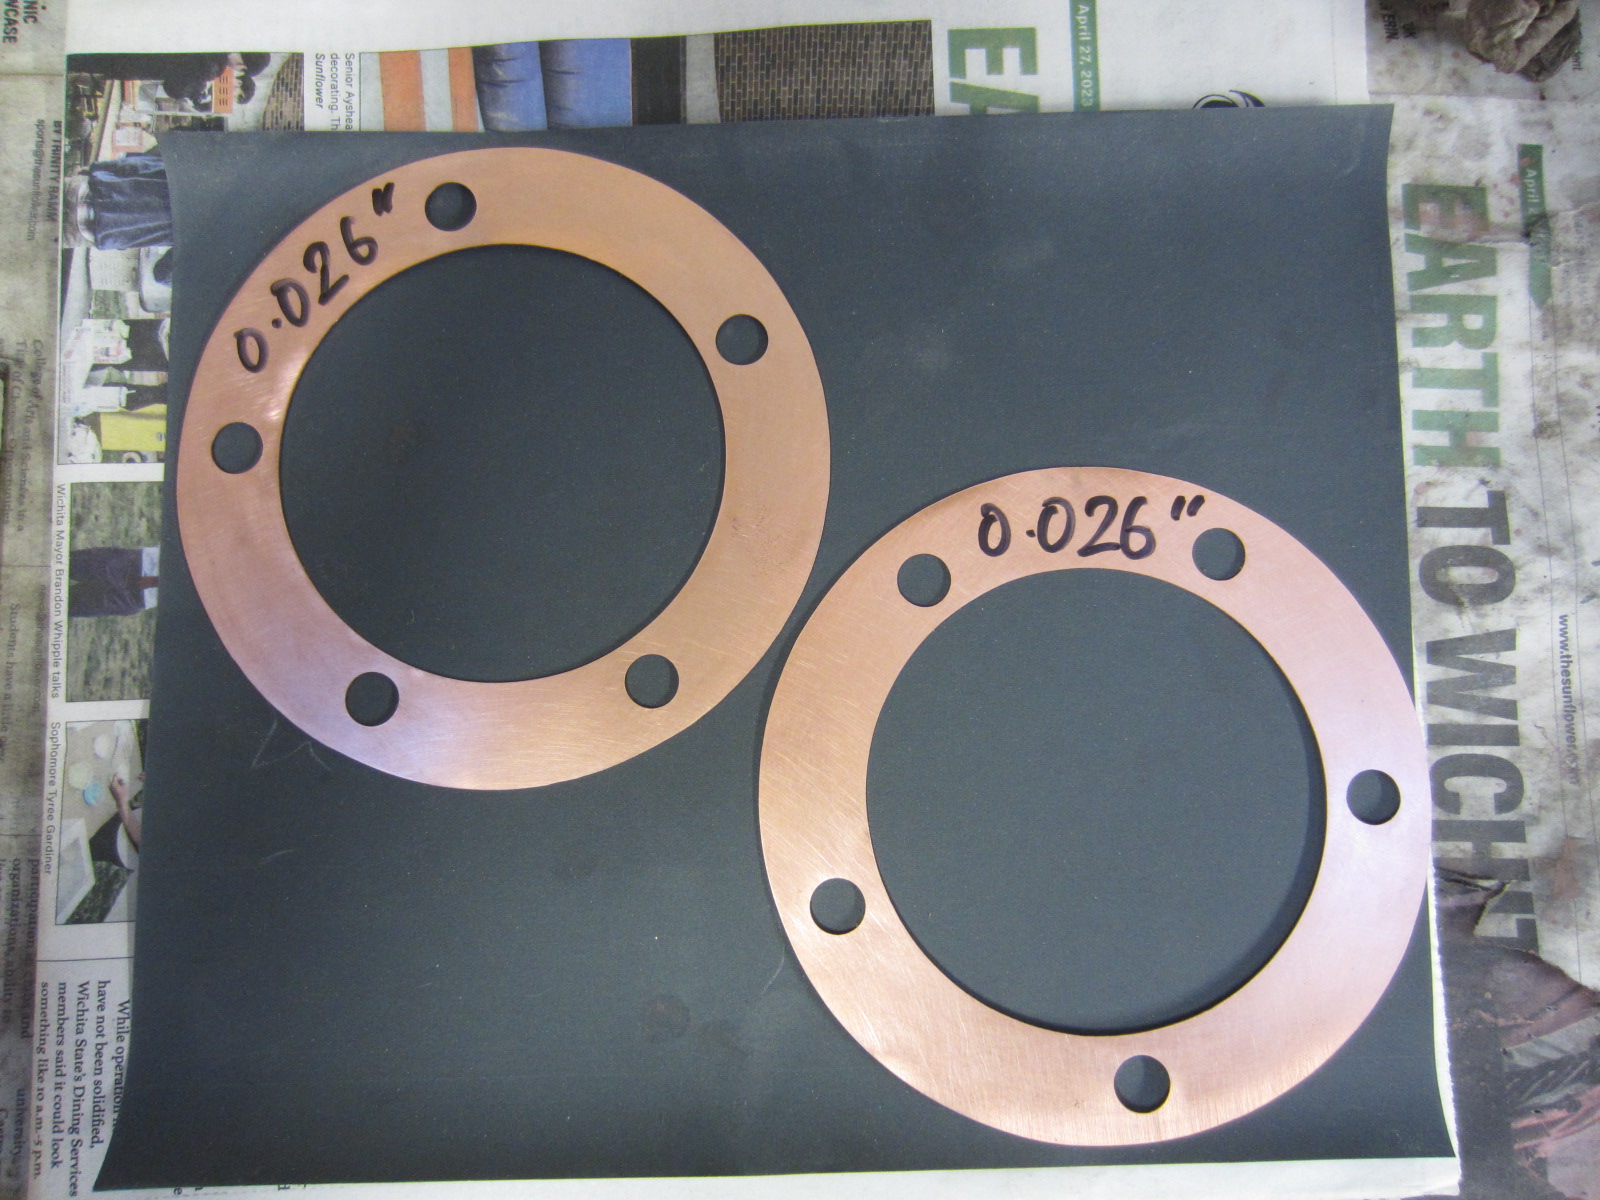
they measure at 0.026", effectively taking the fire-ring-gap to 0.001" to zero, and resulting in a 0.032" squish-band dictated by the base-gasket.
which should be ideal to perfect, but i have some plastigauge to ultimately check assembled clearances.
thats it for now.
cometic advertise customs gaskets available in various materials and numerous thicknesses.
i approached the US via theor website and got no response.
so, via cometic uk, who i came across whilst googling. i ordered 32 thou' and 27 thou' gaskets for flexibility.
27 is what i really wanted, 32 was backup.
cometic uk, came back and said they (cometic US) don't do 27 in copper. They do advertise it though, usual bullshit.
by the way, cometic uk was good to deal with, just a shame the US didn't hold true.
so, anyway, i made my own. cometic, schmometic.
bought some 0.7mm copper sheet, advertised as 99% pure (softest).
using some 3 13/16th existing gaskets i have, measured up and marked out the plate.
i glued the plate to a piece of 6mm ply to aid handling it and help keep it flat under machining.
i simply started by cutting out the centre with a 98mm hole-saw, 100 to 101mm (100.64) is the target size, so bit of room for final finishing.
obviously i had this all clamped down, clamps removed when photo taken.
this was on my little chinese drill-press. its really weak, it was slow going, too much pressure and it would simply stall the motor.
i'll be glad when my alpine mill/drill is setup.
drill out the bolt-holes.
no photo of process, but i then filed the I.D. to correct size.
used a cutting-wheel to remove excess plate from around the edge.
then finally a flap-disc to shape the O.D to size and concentric.
peel off the protective coating and de-burr/reface the copper on some emery with oil. 240 grit and then 800 grit.
i used a polished porcelain tile offcut from recently doing my bathroom as a flat surface.
to remove the glued plywood in order to resurface the other face.
i soaked some kitchen towel in acetone, wrap around the piece, then wrap in kitchen foil.
the foil prevents the acetone evaporating and contain the fumes that quickly break down the glue.
cup of tea later, they fall off the ply sheet.
final resurface, jobe done.
they measure at 0.026", effectively taking the fire-ring-gap to 0.001" to zero, and resulting in a 0.032" squish-band dictated by the base-gasket.
which should be ideal to perfect, but i have some plastigauge to ultimately check assembled clearances.
thats it for now.
Ron
Club Member
Will you have to anneal them before use? I ask because I have read that new copper washers should be annealed before use because the stamping out prosses hardens them and though you have not stamped the gaskets you have done a lot of work to them.
Your filing of the internal finished size looks great. I made some similar sized rings to space my Sportys clutch and couldn't get them anywhere near as tidy as yours. When you've finished this build you will have people queuing round the block trying to get things done.
Your filing of the internal finished size looks great. I made some similar sized rings to space my Sportys clutch and couldn't get them anywhere near as tidy as yours. When you've finished this build you will have people queuing round the block trying to get things done.
jayzedkay
Club Member
Ron, yeah, i will anneal them as a matter of course.
i like copper gaskets based on my experience of them. i had the 'blue' james gaskets is it? go on me in the past.
since moving to copper, never a problem. i've re-used the ones on my 98" a couple of times after top-end adjustments.
anneal them, a spary of copper-coat and be done.
i like the idea that the copper has a good expansion-coefficient and will increase the seal better as it gets hotter.
copper is a no brainer to me; simple, re-useable, robust, proven, diy-able. you can keep your fancy composites and multi-layers.
the filing is 'good enough', if you inspect them close up, they are not prefectly concentric, but they don't have to be.
a good flat surface is what is obviously important.
i think gluing them to a base-plate of some sort for support and handling not only helps, but is essential at this thicknes?
no deflection during filing, minimal break-out after drilling/cutting.
if they were glued to a piece of ally plate as opposed to ply, i think it'd be even better? or better still a thick steel-plate as a template.
or simply provide a cad drawing to get laser cut? but where's the fun in that?
i mark them out with a compass-scribe from a centre point, so you have a fine-line to work too.
i just scribed out the holes for bolts, but at some point i'll work out the pcd and create a cad drawing for reference.
i suppose when my mill/drill is set up i could use a fly-cutter to get exact-concentric diameters?
all good buddy.
jayzedkay
Club Member
Little bit of progress on this build.
some previous posts (page 1) covered the pinion bearings and i touched on plug-test-fitting an 'evo' bearing. but i actually did a bit of work on this which, alot more than what i reported. So it's presented here in more detail, some works in retrospect, other works new.
i wanted to consider using an evo pinion bearing for a couple of reasons:
a) i have NOS HD bearings, so i consider the origins of acceptable quality, not VTwin/Eastern/MCS thirdparty lottery? I wanted the bottom end as strong as possible, though i have no bad experiences from my 10k+ miles 98" build, third-party chinkwainese bottom end?
b) i'm thinking the longer roller will give more support on the pinion than the two short rollers of an oem shovel setup. But there is a compromise here, there is one less roller on an evo setup compared to a shovel, so maybe kinda works out the same?
anyway, it's what i wanted to look at.
c) rollers are a little larger than the std 0.250" shovel ones. Evo 'green' rollers, the smallest measure at 0.253 'loose' to 0.254 'snug' fit through a micrometer. 'White' rollers, next size up 0.254 to 0.255 respectively.
first off problem is that the evo bearing is longer than a shovel-config, so with the std 0.070" thrust washer there isn't the room to get the snap-ring on and retain end-clearance on. Below is the bearing sitting on a 0.070" thrust and it obscures the snap-groove.
snap-ring has to be the evo type which is significantly 'wider' than a shovel spiral-ring. If using a shovel ring, you have to use another thrust washer on the outer-face, exacerbating the problem.
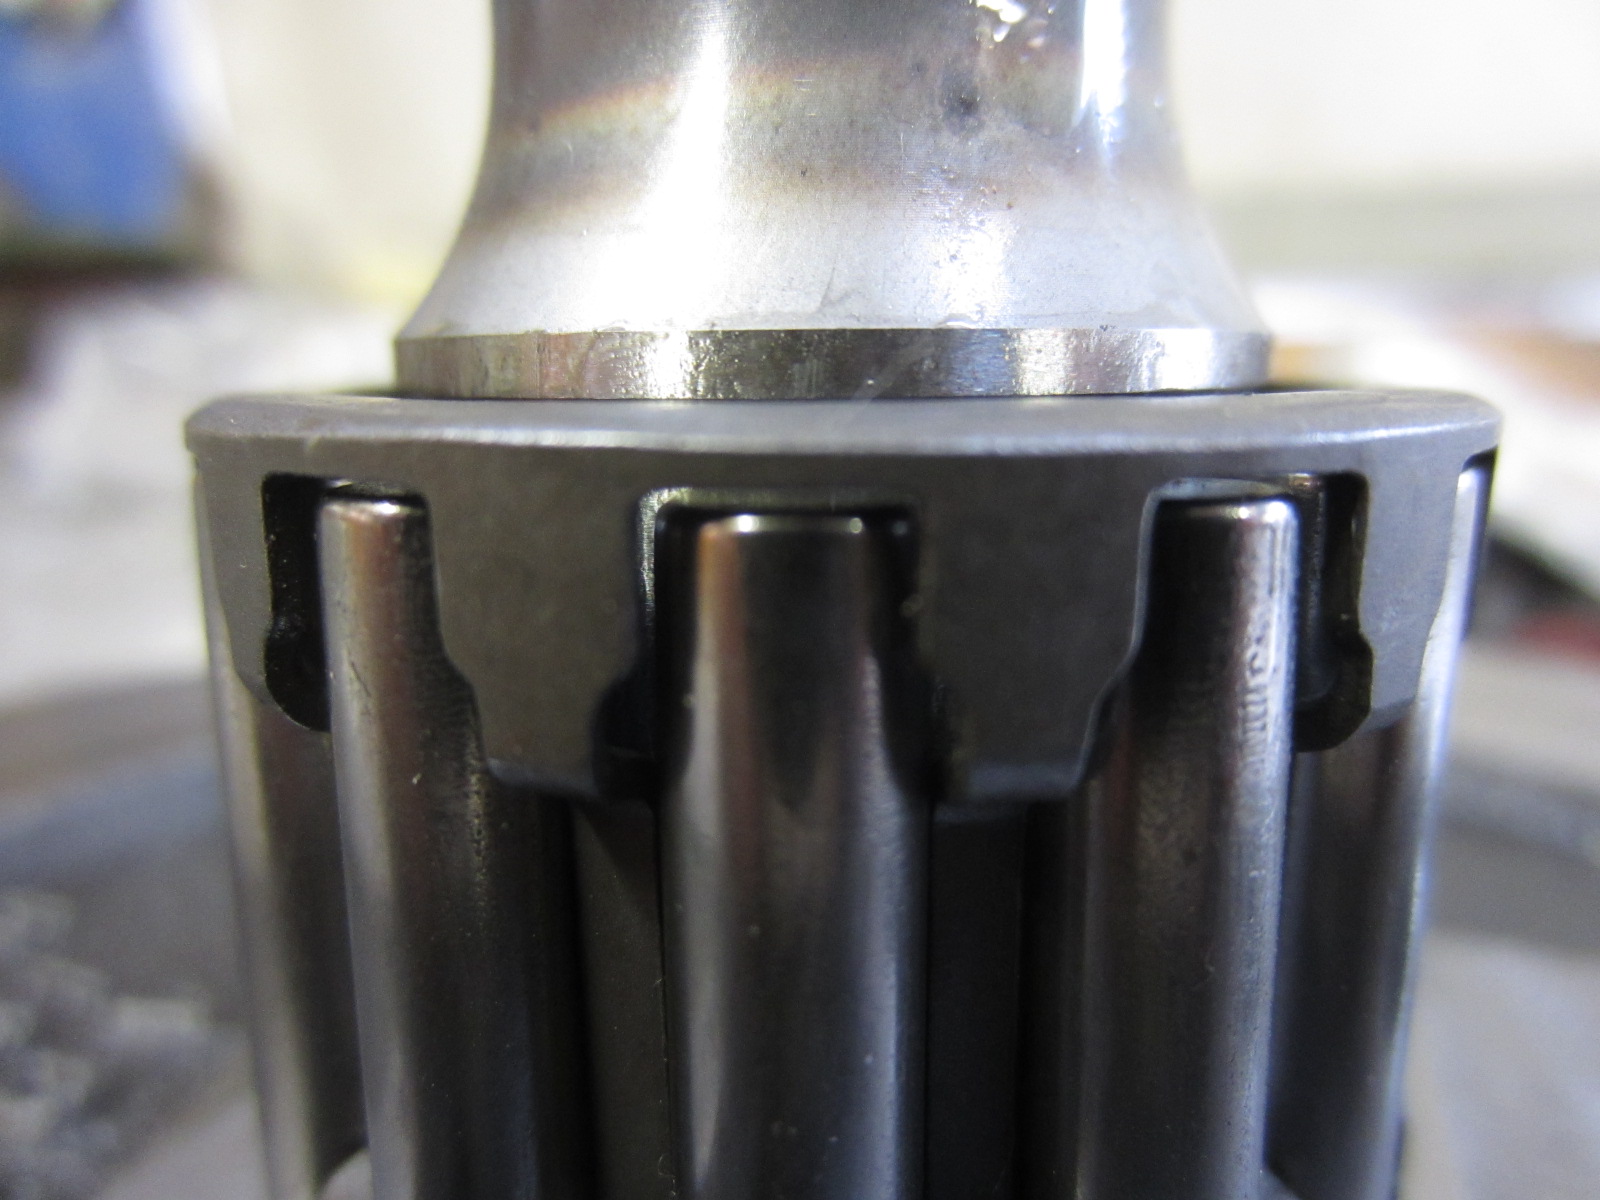
after various checks with feeler blades as shims etc. I found that with 0.050" as thrust-washer, it would allow the snap ring to be fitted, but have no effective endplay for the bearing.
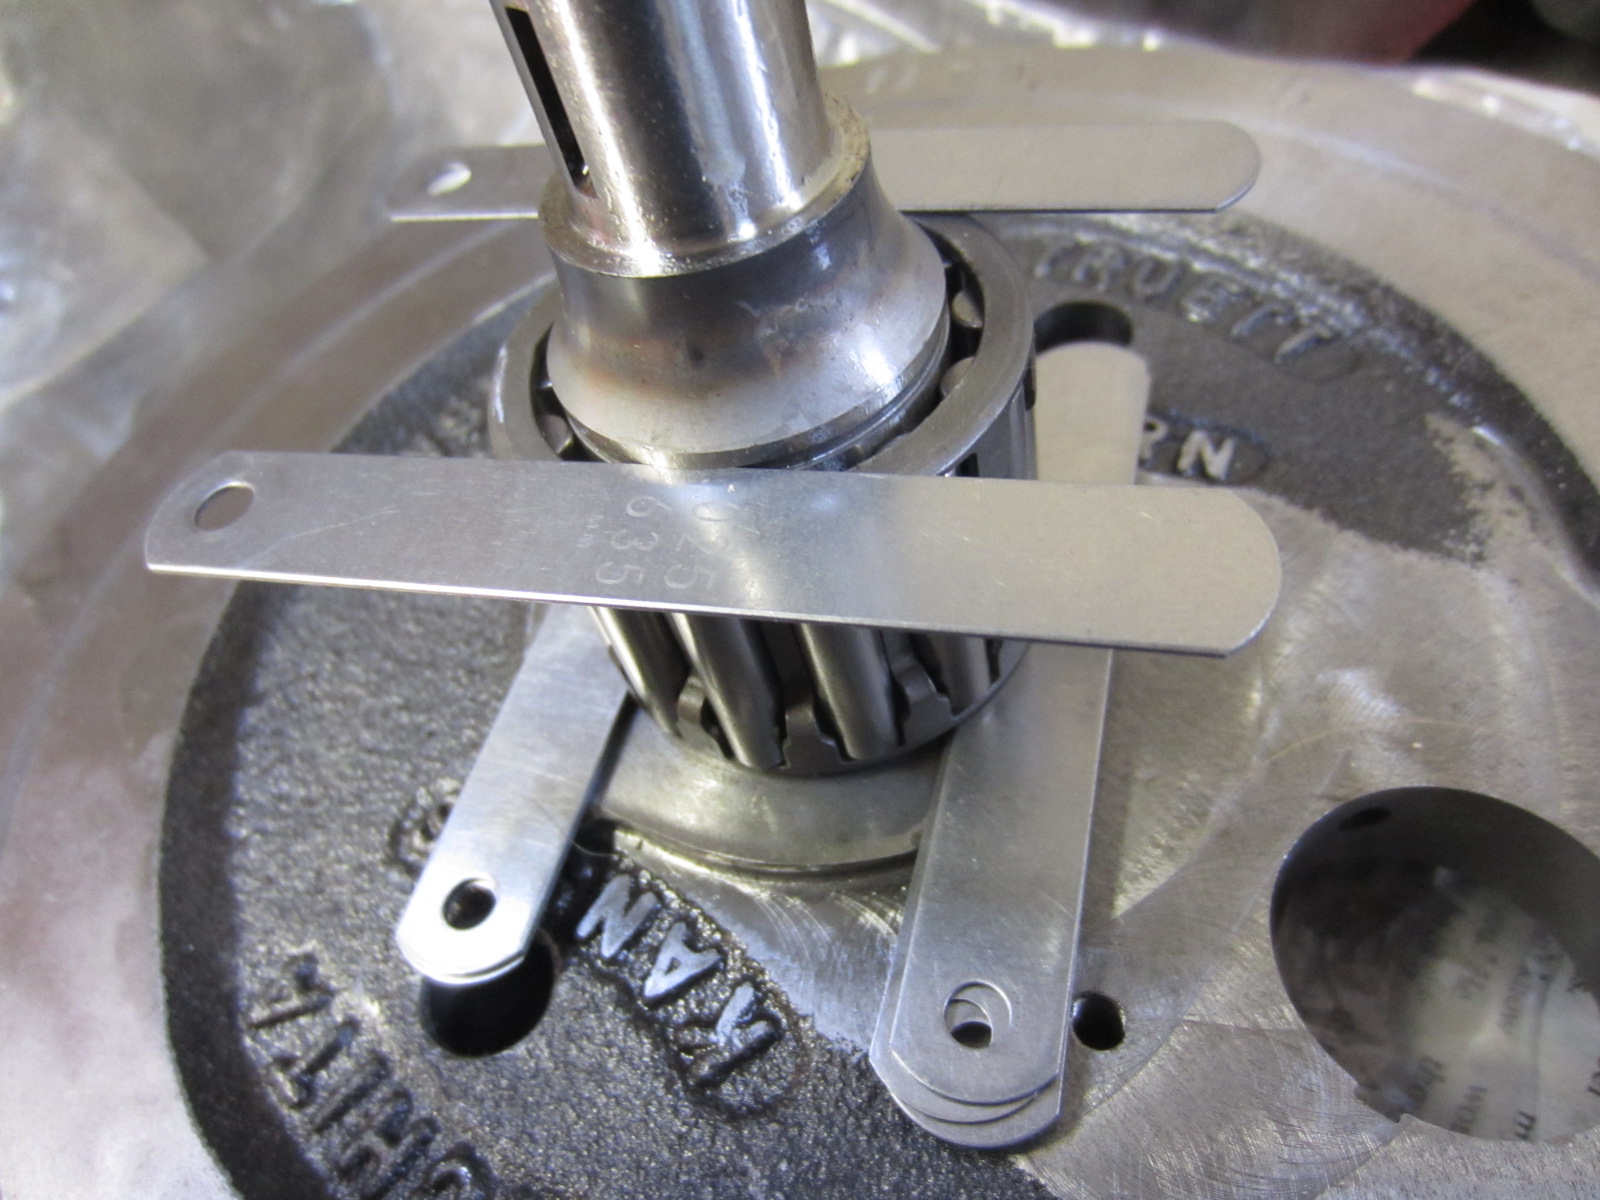
As a comparison a shovel-cage setup with 0.070" at base had about 0.025" endplay on the cages. So this was my benchmark for bearing endplay clearance for confidence.
one option presented here for comprehension more than anything is that if the flywheels have the latest taper/oil-way, you can effectively fit an 'evo' pinion, which is dimensionally the same, but has additional length on the bearing-surface for the snap-ring. i can't recall the exact part numbers now, but i already have the jims pinion that came with the flywheel, plus it isn't the correct taper/oil-way on the flywheel to fit one anyway. so that wasn't an option to me.
considering options:
a) machine/grind snap-groove wider to compensate; machining pinion wouldn't be easy. it's hard, rockwell of about mid/late-60s i think?
grinding groove out more? unless it was done professionally, diy likely fuck it up? Think cobbled up dremmel et al?
b) machine flywheel-shoulder that the thrust-washer sits on, taking 0.020" off. easy to do, but i didn't want to do that.
c) S&S make a 0.050" pinion thrust washer, so that tied in well with what appeared to be required. but would have to address the endplay issue.
d) thinner thrust washer to allow clip and endplay. Seems the solution, but would leave rollers hanging 'off' the pinion-roller-surface at flywheel end.
I couldn't find any S&S 0.050" thrust washers stocked and looked like none would be available anytime soon?
I got a local engineering firm to surface grind the 0.070" washers i had. These washers were a new aftermarket pack of five I bought for lack of an alternative, and the surfaces were shocking on some of them. testament to third-party crap.
Usually for stuff like this; small internal parts etc i try and get OEM. but nothing available, so had to go aftermarket. Anyway, though i only needed one, i had all five done, made sense too. Never know, i might do this again or help someone else out?
thrust-washers, freshly ground and measuring 0.050" on the dot. sweet amundo.
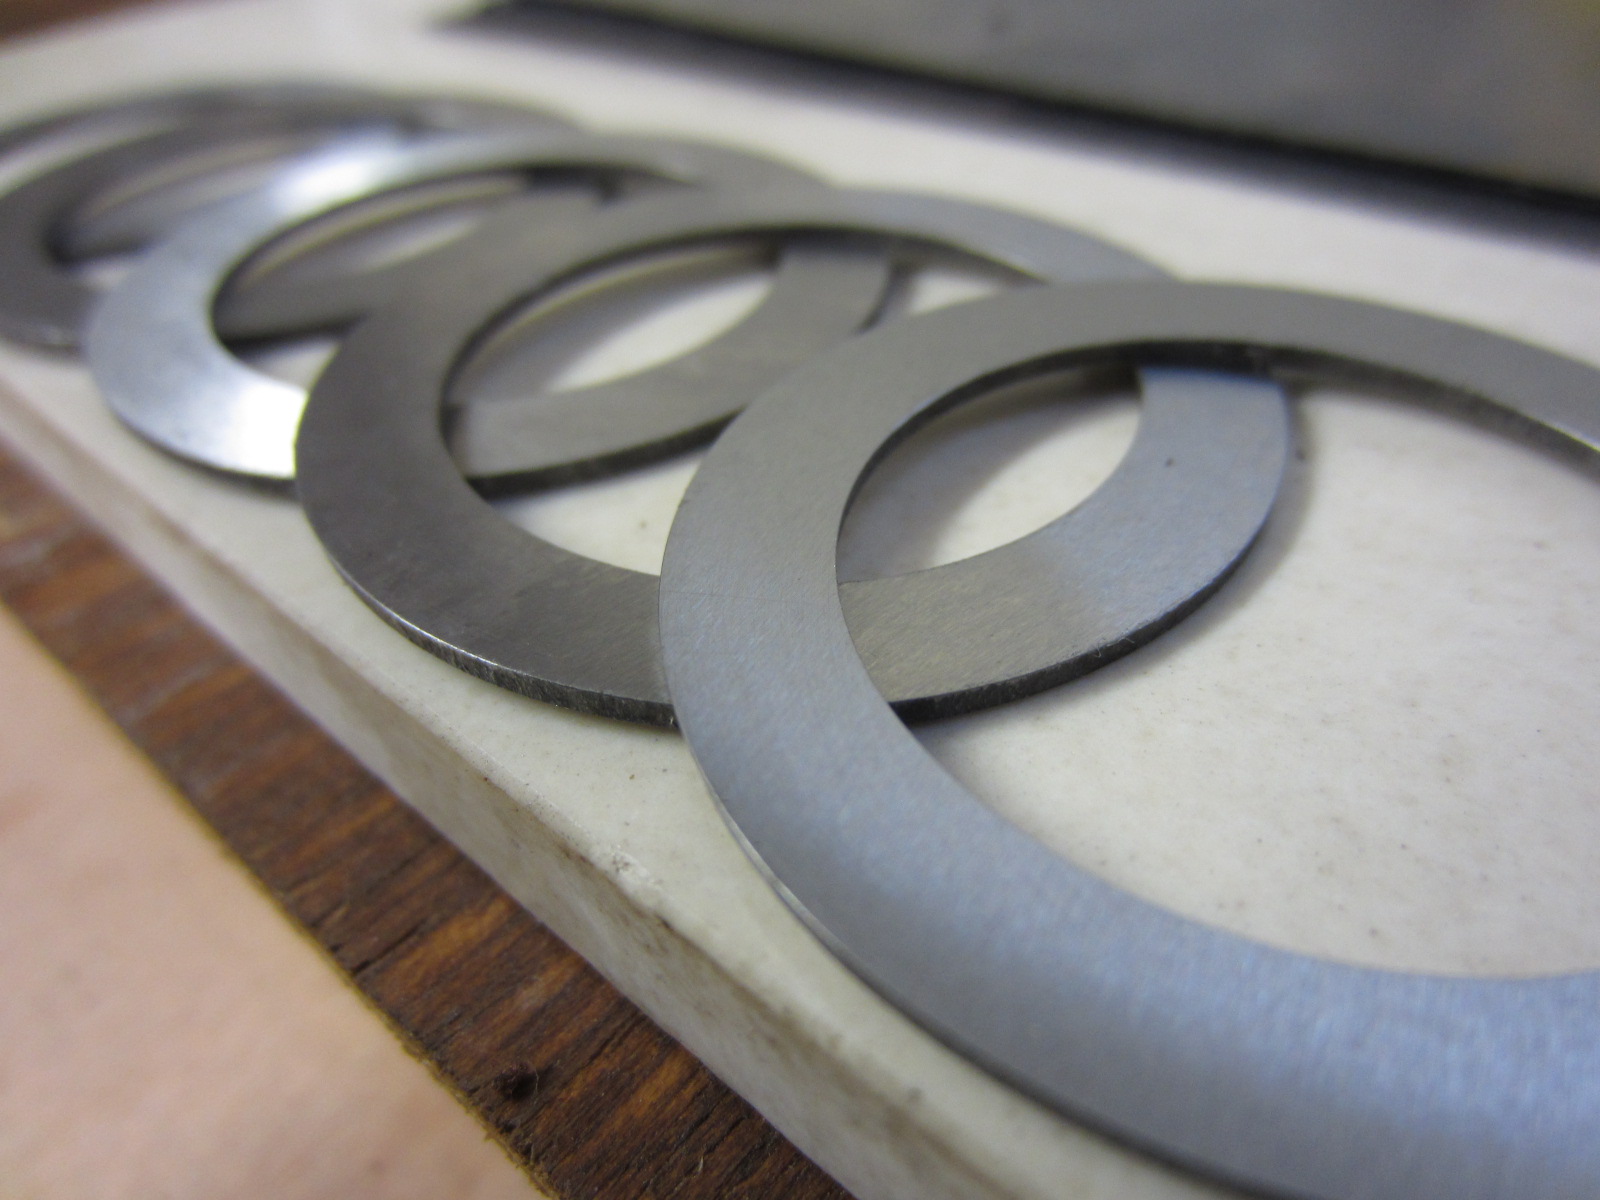
still had the issue of endplay. after discussing with other builders, machinists et al. Somehting i never considered or thought off was removing a little material from the bearing-cage end-faces. The cage 'ends' are a little over millimeter thick, 1.2 something like that. I can't recall the exact number now and don't appear to have it in my log-book scribbles, i should update that?
but if i wanted to obtain approx 0.025" like a std shovel setup, i'd have to take approx 0.010" off each end. I didn't see that would compromise the cage integrity. Plus the stamped cage have some slight anomolies where it appears 'welded' together, so it isn't 'perfectly' flat at it's ends by any means. Also the stamped clip has burrs and kinda everso slightly distorted where it's 'stamped' out i guess?
first thought is simply have the cage turned down on a lathe, as others do. But i really didn't want the lead-time/delays this would introduce, and would rather do it myself, without fucking it up anyway? This is one small, but significant aspect as to why i recently invested in a small lathe, but at this juncture i didn't have the lathe. So i mulled over how best to do it?
After going round the houses, i came back to the simplicity of hand grinding on a flat surface. I was worried about the 'parallelness' obtained by hand grinding by any manner without a 'jig' of some kind to hold it true? But, from past experience, done gently only small amounts are removed without hours of lapping. So nothing could/would run out of control. So i went for it.
As it happened after recently tiling the bathroom with polished porcelain tiles. I'd kept a large offcut for a smooth grinding surface. I spray oil on the tile, adhere a full sheet of A4 wet/dry paper, then oil on the paper and proceed in steadily grinding the 'faces' with a figure of '8' pattern. 240, 600, 800. just best options in what i had in my paper stash.
anyway, they both got the treatment. the bearing cage was 1.270" wide and it ended up being 1.259" wide, so effectively 0.011" removed. I stopped lapping when no effective anomolies could be seen on the cage-faces. The clip was 0.045" thick and ended up being 0.038" thick, so 0.007" thinner. Gaining about 0.018" in total, but likely more due to those welding anomolies?
parallelness, measuring at various points cage was negligibly out. better than with the anomolies anyway.
cage and clip after the the 'grind' treatment.
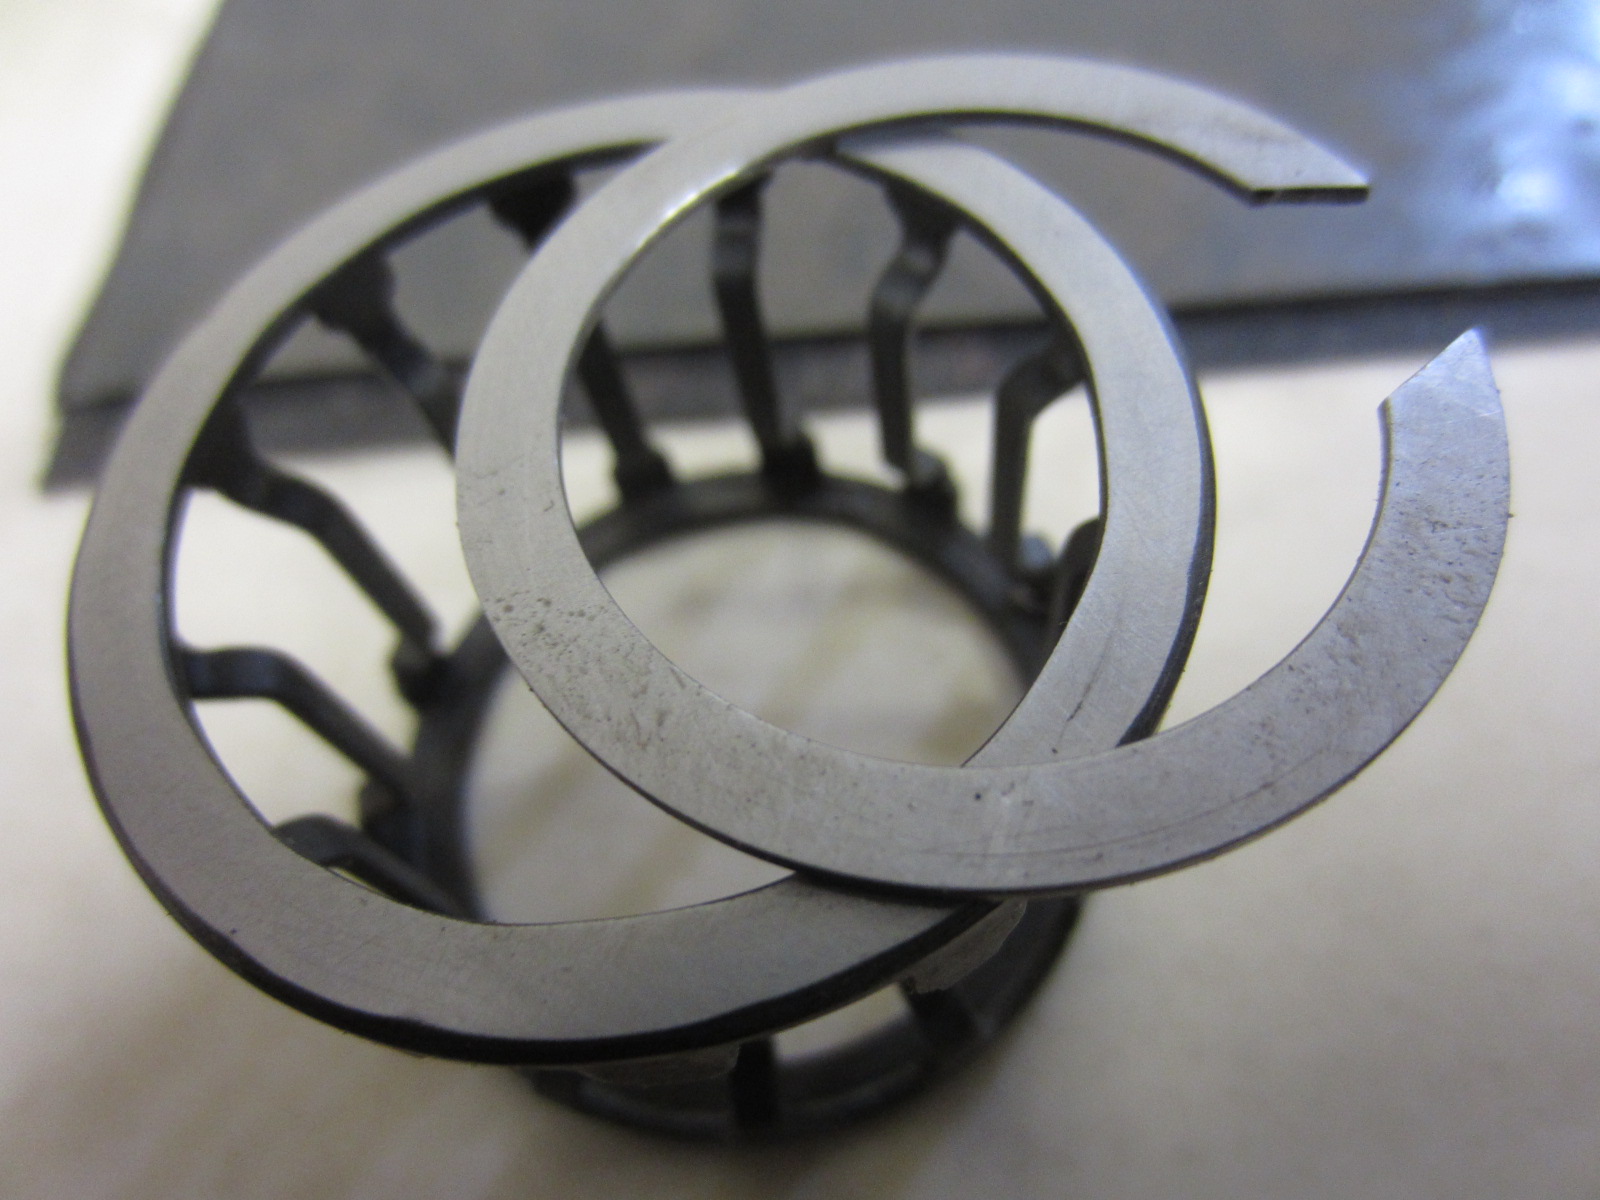
so after all this dickin' about an initial test fit was carried out. See where i was with it.
with the 0.050" thrust washer at base, 'massaged' clip and cage, it left enough play to easily get 0.020" feeler in and a 'snug' 0.025" feeler. So endplay now comparable to what i was aiming for. I'm happy with that, so left it alone.
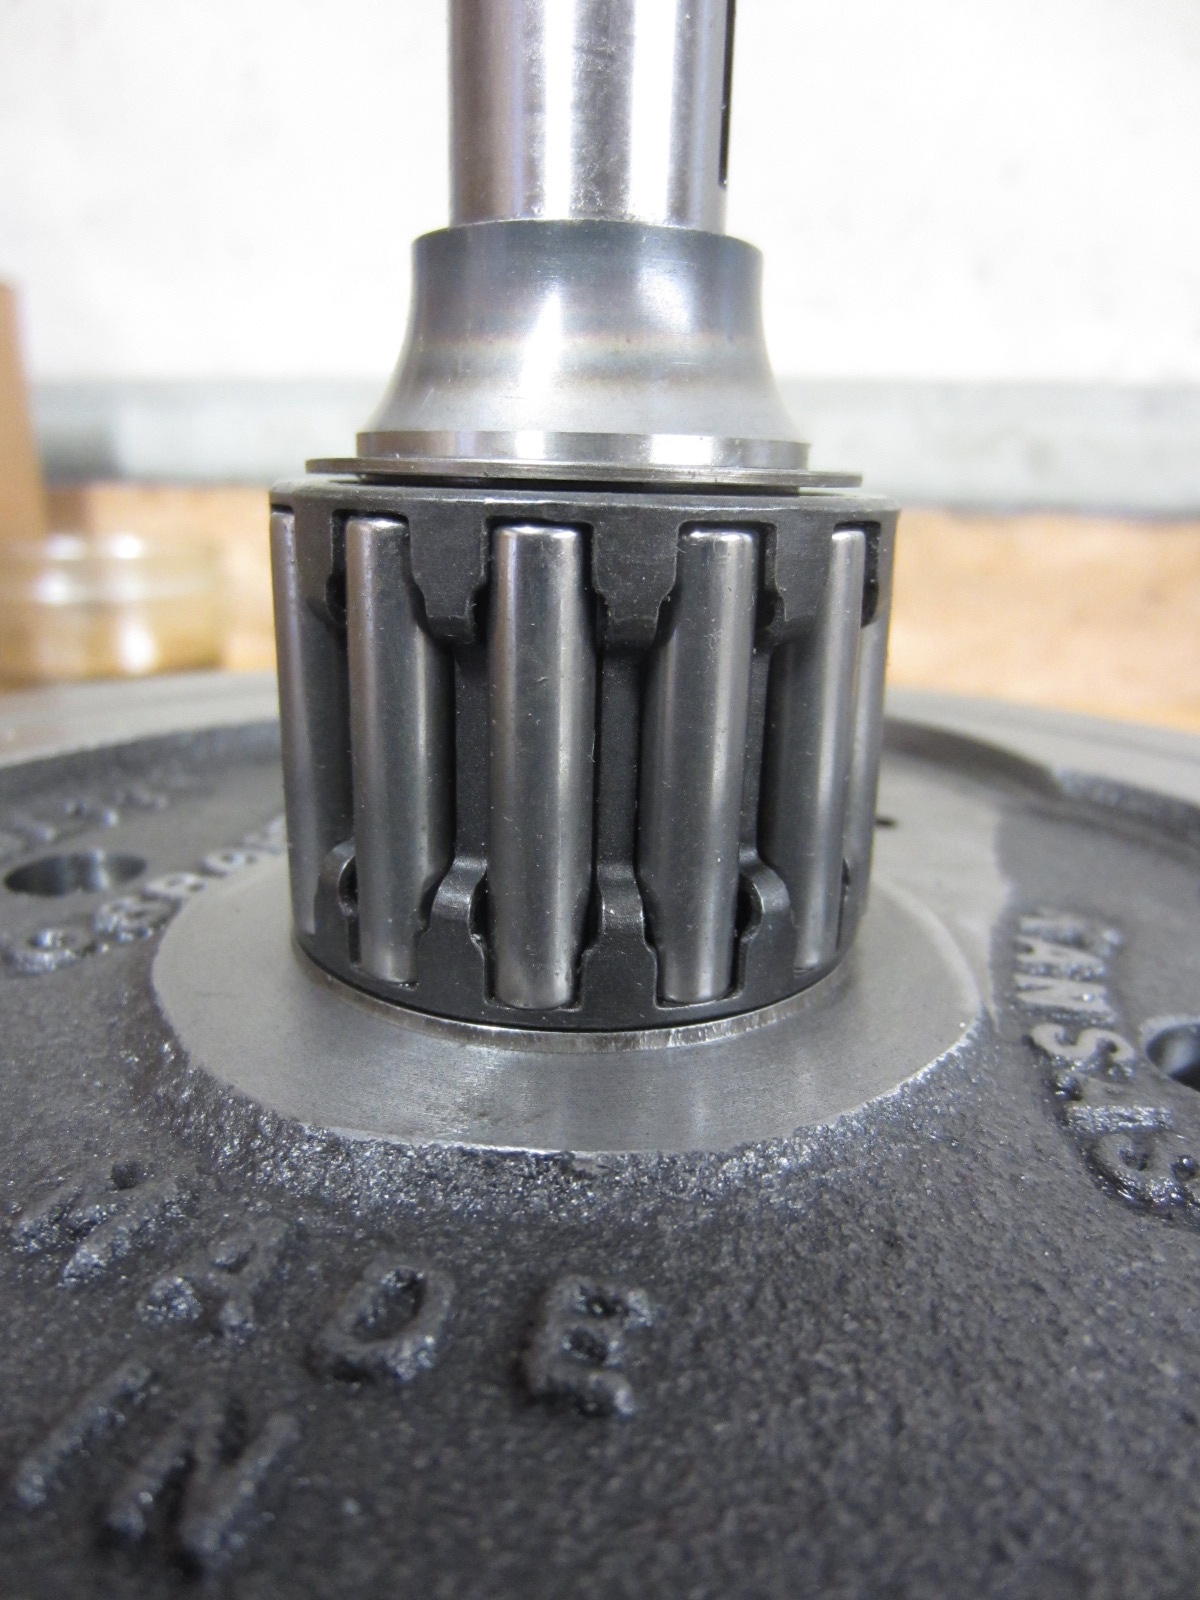
let me add though, during this lark, i was concious that the rollers do not want to 'overhang' the pinion-roller-surface.
there's bags of room at the clip end, but at the flywheel end, having longer rollers, a roller sitting lower on the pinion etc? It has to be checked.
taking various measurements; roller-edge to cage-edge, pinion-surface-edge to top of thrust-face, roller-endplay in cage etc etc. It worked out it was potentially on the limit. But all these small measurements added up often accumulate errors, so wanted a more definitive 'tangible' check?
I ended up smearing a light coat of moly-grease on the rollers/pinion and rotaing the bearing, carefully lifting it off and inspecting the grease 'lines' in attempt to see where their edges were.
Anyway, all was good, i've runout of image-quota here, so i'll show it following on.
Plus I have to say after all this fucking about; time, expense, lying awake at night thinking about this shit. I may well end up using the standard shovel cage setup. I have some NOS OEM HD cages, rollers etc in my stash, so the integrity is there.
I don't think i will though, now it appears it's sorted, but it's not off the table. Still ahve to check how it all fits together when properly assembled, once tapers pulled torqued-in tight etc. But I envisage that only changes things by a thou' or so?
I just had to investigate the use of an evo bearing in a shovel.
still have to lap the case-race to get the correct clearance, but i have the tools, so no big deal come the time. plus check how the rollers sit within the case-race, but i don't envisage any issues there?
 .
.
some previous posts (page 1) covered the pinion bearings and i touched on plug-test-fitting an 'evo' bearing. but i actually did a bit of work on this which, alot more than what i reported. So it's presented here in more detail, some works in retrospect, other works new.
i wanted to consider using an evo pinion bearing for a couple of reasons:
a) i have NOS HD bearings, so i consider the origins of acceptable quality, not VTwin/Eastern/MCS thirdparty lottery? I wanted the bottom end as strong as possible, though i have no bad experiences from my 10k+ miles 98" build, third-party chinkwainese bottom end?
b) i'm thinking the longer roller will give more support on the pinion than the two short rollers of an oem shovel setup. But there is a compromise here, there is one less roller on an evo setup compared to a shovel, so maybe kinda works out the same?
anyway, it's what i wanted to look at.
c) rollers are a little larger than the std 0.250" shovel ones. Evo 'green' rollers, the smallest measure at 0.253 'loose' to 0.254 'snug' fit through a micrometer. 'White' rollers, next size up 0.254 to 0.255 respectively.
first off problem is that the evo bearing is longer than a shovel-config, so with the std 0.070" thrust washer there isn't the room to get the snap-ring on and retain end-clearance on. Below is the bearing sitting on a 0.070" thrust and it obscures the snap-groove.
snap-ring has to be the evo type which is significantly 'wider' than a shovel spiral-ring. If using a shovel ring, you have to use another thrust washer on the outer-face, exacerbating the problem.
after various checks with feeler blades as shims etc. I found that with 0.050" as thrust-washer, it would allow the snap ring to be fitted, but have no effective endplay for the bearing.
As a comparison a shovel-cage setup with 0.070" at base had about 0.025" endplay on the cages. So this was my benchmark for bearing endplay clearance for confidence.
one option presented here for comprehension more than anything is that if the flywheels have the latest taper/oil-way, you can effectively fit an 'evo' pinion, which is dimensionally the same, but has additional length on the bearing-surface for the snap-ring. i can't recall the exact part numbers now, but i already have the jims pinion that came with the flywheel, plus it isn't the correct taper/oil-way on the flywheel to fit one anyway. so that wasn't an option to me.
considering options:
a) machine/grind snap-groove wider to compensate; machining pinion wouldn't be easy. it's hard, rockwell of about mid/late-60s i think?
grinding groove out more? unless it was done professionally, diy likely fuck it up? Think cobbled up dremmel et al?
b) machine flywheel-shoulder that the thrust-washer sits on, taking 0.020" off. easy to do, but i didn't want to do that.
c) S&S make a 0.050" pinion thrust washer, so that tied in well with what appeared to be required. but would have to address the endplay issue.
d) thinner thrust washer to allow clip and endplay. Seems the solution, but would leave rollers hanging 'off' the pinion-roller-surface at flywheel end.
I couldn't find any S&S 0.050" thrust washers stocked and looked like none would be available anytime soon?
I got a local engineering firm to surface grind the 0.070" washers i had. These washers were a new aftermarket pack of five I bought for lack of an alternative, and the surfaces were shocking on some of them. testament to third-party crap.
Usually for stuff like this; small internal parts etc i try and get OEM. but nothing available, so had to go aftermarket. Anyway, though i only needed one, i had all five done, made sense too. Never know, i might do this again or help someone else out?
thrust-washers, freshly ground and measuring 0.050" on the dot. sweet amundo.
still had the issue of endplay. after discussing with other builders, machinists et al. Somehting i never considered or thought off was removing a little material from the bearing-cage end-faces. The cage 'ends' are a little over millimeter thick, 1.2 something like that. I can't recall the exact number now and don't appear to have it in my log-book scribbles, i should update that?
but if i wanted to obtain approx 0.025" like a std shovel setup, i'd have to take approx 0.010" off each end. I didn't see that would compromise the cage integrity. Plus the stamped cage have some slight anomolies where it appears 'welded' together, so it isn't 'perfectly' flat at it's ends by any means. Also the stamped clip has burrs and kinda everso slightly distorted where it's 'stamped' out i guess?
first thought is simply have the cage turned down on a lathe, as others do. But i really didn't want the lead-time/delays this would introduce, and would rather do it myself, without fucking it up anyway? This is one small, but significant aspect as to why i recently invested in a small lathe, but at this juncture i didn't have the lathe. So i mulled over how best to do it?
After going round the houses, i came back to the simplicity of hand grinding on a flat surface. I was worried about the 'parallelness' obtained by hand grinding by any manner without a 'jig' of some kind to hold it true? But, from past experience, done gently only small amounts are removed without hours of lapping. So nothing could/would run out of control. So i went for it.
As it happened after recently tiling the bathroom with polished porcelain tiles. I'd kept a large offcut for a smooth grinding surface. I spray oil on the tile, adhere a full sheet of A4 wet/dry paper, then oil on the paper and proceed in steadily grinding the 'faces' with a figure of '8' pattern. 240, 600, 800. just best options in what i had in my paper stash.
anyway, they both got the treatment. the bearing cage was 1.270" wide and it ended up being 1.259" wide, so effectively 0.011" removed. I stopped lapping when no effective anomolies could be seen on the cage-faces. The clip was 0.045" thick and ended up being 0.038" thick, so 0.007" thinner. Gaining about 0.018" in total, but likely more due to those welding anomolies?
parallelness, measuring at various points cage was negligibly out. better than with the anomolies anyway.
cage and clip after the the 'grind' treatment.
so after all this dickin' about an initial test fit was carried out. See where i was with it.
with the 0.050" thrust washer at base, 'massaged' clip and cage, it left enough play to easily get 0.020" feeler in and a 'snug' 0.025" feeler. So endplay now comparable to what i was aiming for. I'm happy with that, so left it alone.
let me add though, during this lark, i was concious that the rollers do not want to 'overhang' the pinion-roller-surface.
there's bags of room at the clip end, but at the flywheel end, having longer rollers, a roller sitting lower on the pinion etc? It has to be checked.
taking various measurements; roller-edge to cage-edge, pinion-surface-edge to top of thrust-face, roller-endplay in cage etc etc. It worked out it was potentially on the limit. But all these small measurements added up often accumulate errors, so wanted a more definitive 'tangible' check?
I ended up smearing a light coat of moly-grease on the rollers/pinion and rotaing the bearing, carefully lifting it off and inspecting the grease 'lines' in attempt to see where their edges were.
Anyway, all was good, i've runout of image-quota here, so i'll show it following on.
Plus I have to say after all this fucking about; time, expense, lying awake at night thinking about this shit. I may well end up using the standard shovel cage setup. I have some NOS OEM HD cages, rollers etc in my stash, so the integrity is there.
I don't think i will though, now it appears it's sorted, but it's not off the table. Still ahve to check how it all fits together when properly assembled, once tapers pulled torqued-in tight etc. But I envisage that only changes things by a thou' or so?
I just had to investigate the use of an evo bearing in a shovel.
still have to lap the case-race to get the correct clearance, but i have the tools, so no big deal come the time. plus check how the rollers sit within the case-race, but i don't envisage any issues there?
jayzedkay
Club Member
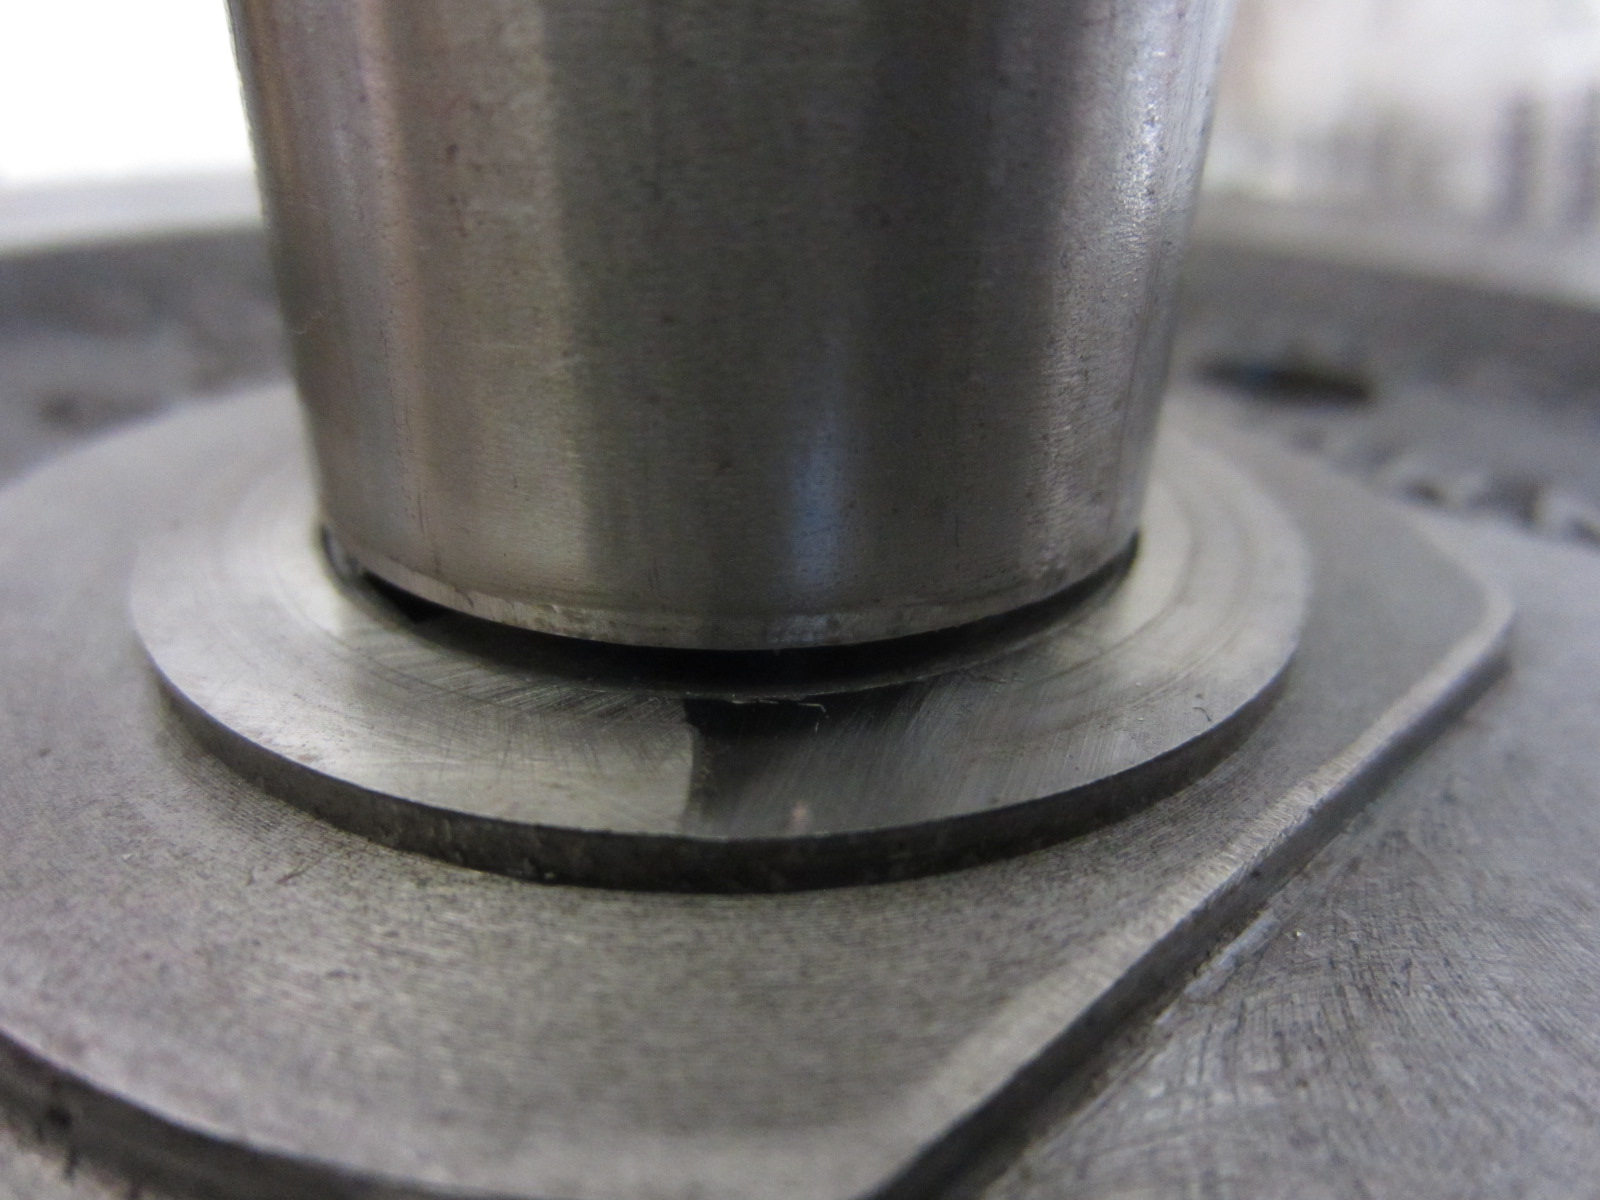
As promised, rollers-lower-edge appear to sit comfortably on the pinion-roller-surface.
i'll leave it at that regarding pinions and rollers for now. they're doin' me head in.
grease-line indicating where roller-edge locates.
next update is pistons.
recall the saga of having to machine the domes to obtain the correct dome-cc to obtain desired mechanical C:R?
Though the most practicable approach would be to simply carve off the required material from the top of the piston, resulting in the same flat-top, just shallower?
I didn't want to do that. I wanted a spherical-dome of required volume to get a more 'optimal' combustion chamber by reducing obstructions and increasing 'ease' of flow/travel to combustion-mixture and flame-front etc. it's most likely unoticeable simply stooging around street-rpms etc. But it's what i wanted to do enjoying the procedure of it. The thought process, how to engineer it, the satisfaction of the solution, finished component(s). It's definitely more in the 'doing' than the 'having'?
All the homework was done and shown previously with casting a resin copy of the piston and modelling, machining, measuring etc to see what would be required. First thing would be the piston jig, how was it to be held to provide safe, reliable machining. Fucking up was not an option here. These axtell/JE pistons are not cheap and i do not want to have to buy more? They also take forever to get hold off.
google and discussions with other builder/machinsts didn't really provide a solution. it all factors on the piston-form. Some are easy to hold, they provide a register as part of the casting/forging and a jig is relatively a straight forward affair. These pistons do not provide any convenient register to work off. All solutions would have some inherent complexity, it was just which complexity was the simplest and most reliable?
Paul, the machinist I use and myself, had to come up with the best way to hold the piston providing a secure register against movement perpendicular to the gudgeon-pin, including ability to adjust and get it 'clocked' level. Similiarly a method of securing against the movement along the axis of the gudgeon-pin and allow this to be clocked too. Also security against the piston-skirt to prevent any side-ways movement. All bases covered 'X', 'Y' and 'Z'.
The result was kinda an elaborate affair, but it could not be achieved any other way really.
hopefully you can sorta figure out what's going on?
imagine a piston fitted and it would rock side-to-side and back-and-forth without the screws and could slide side-to-side too.
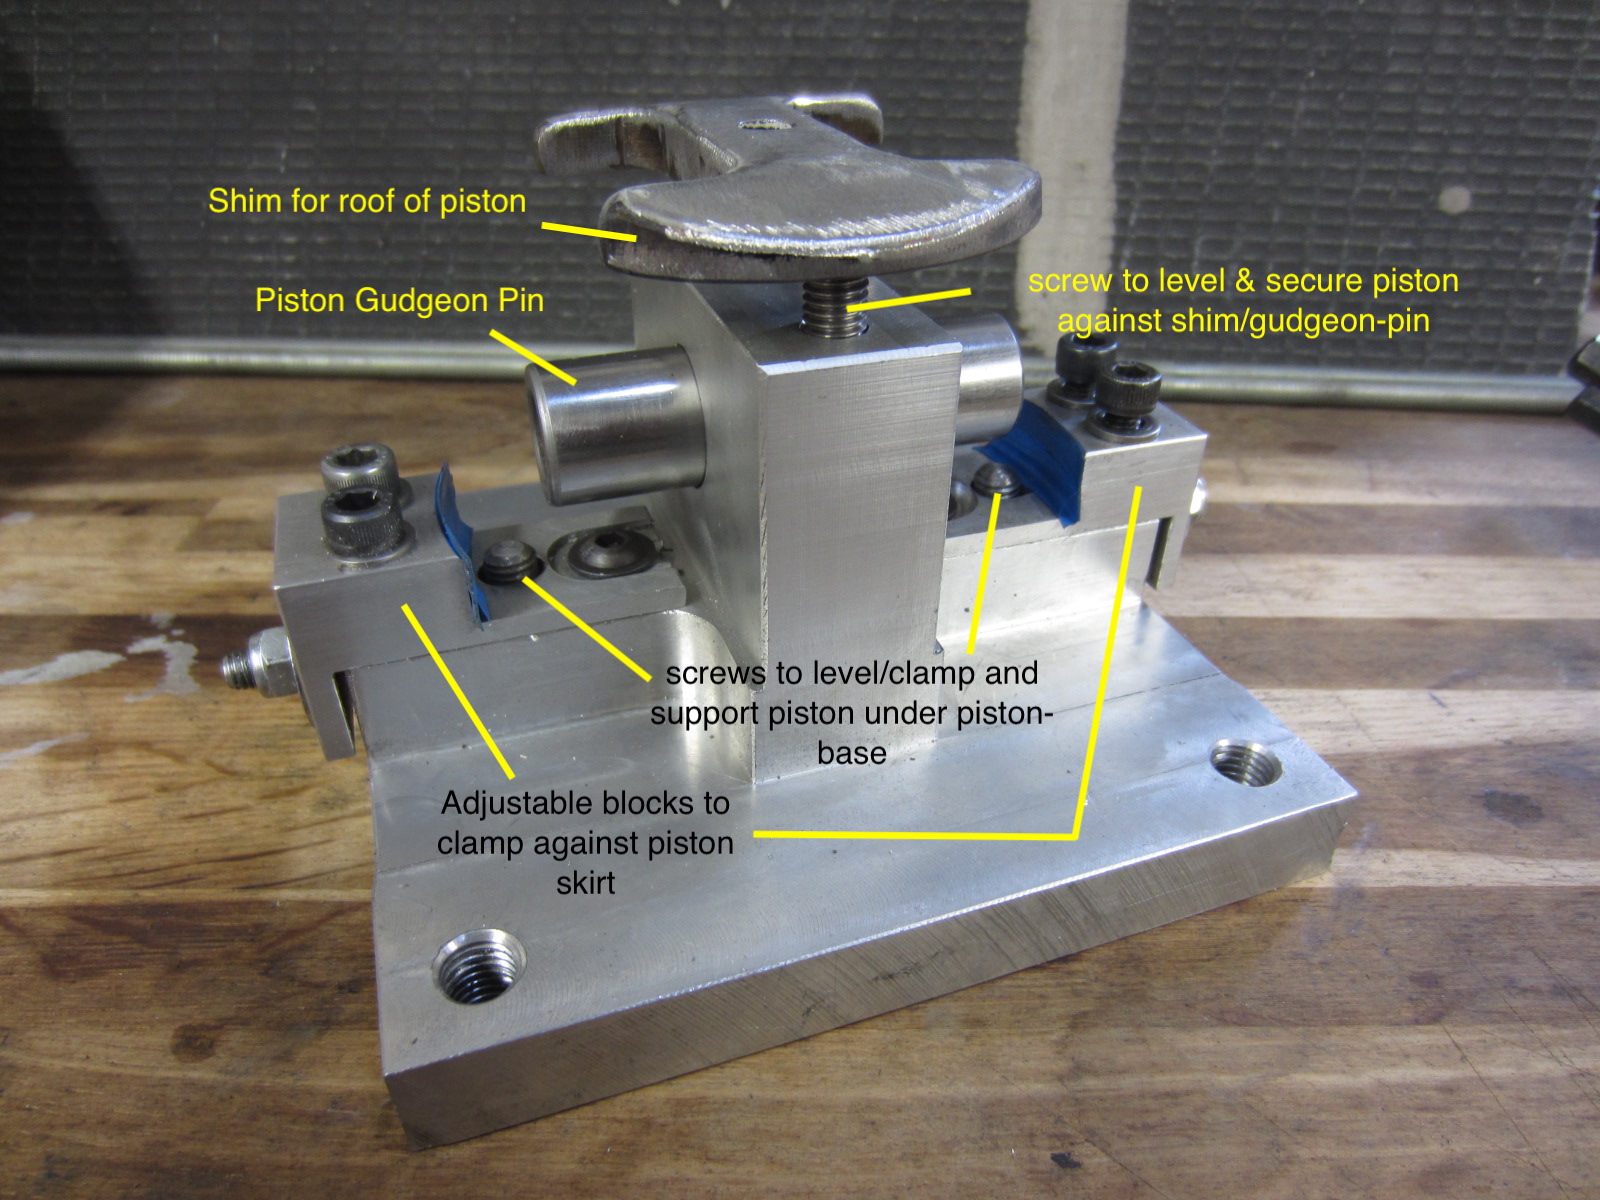
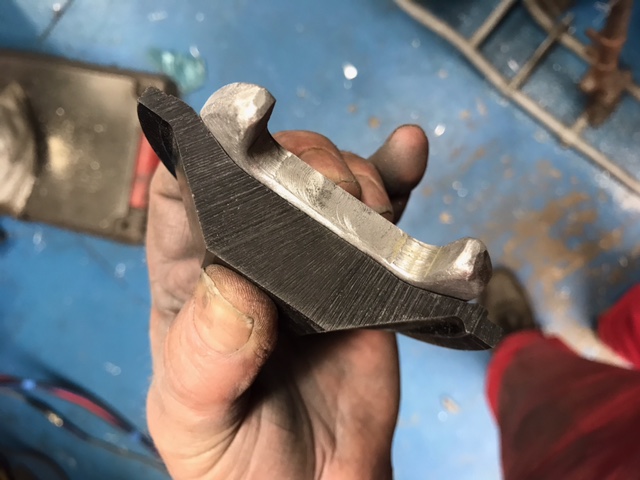
The 'shim' for the roof of the piston, which is 10mm steel plate is contoured to follow the internal profile of the piston.
here it is checked against a slice of a resin copy.
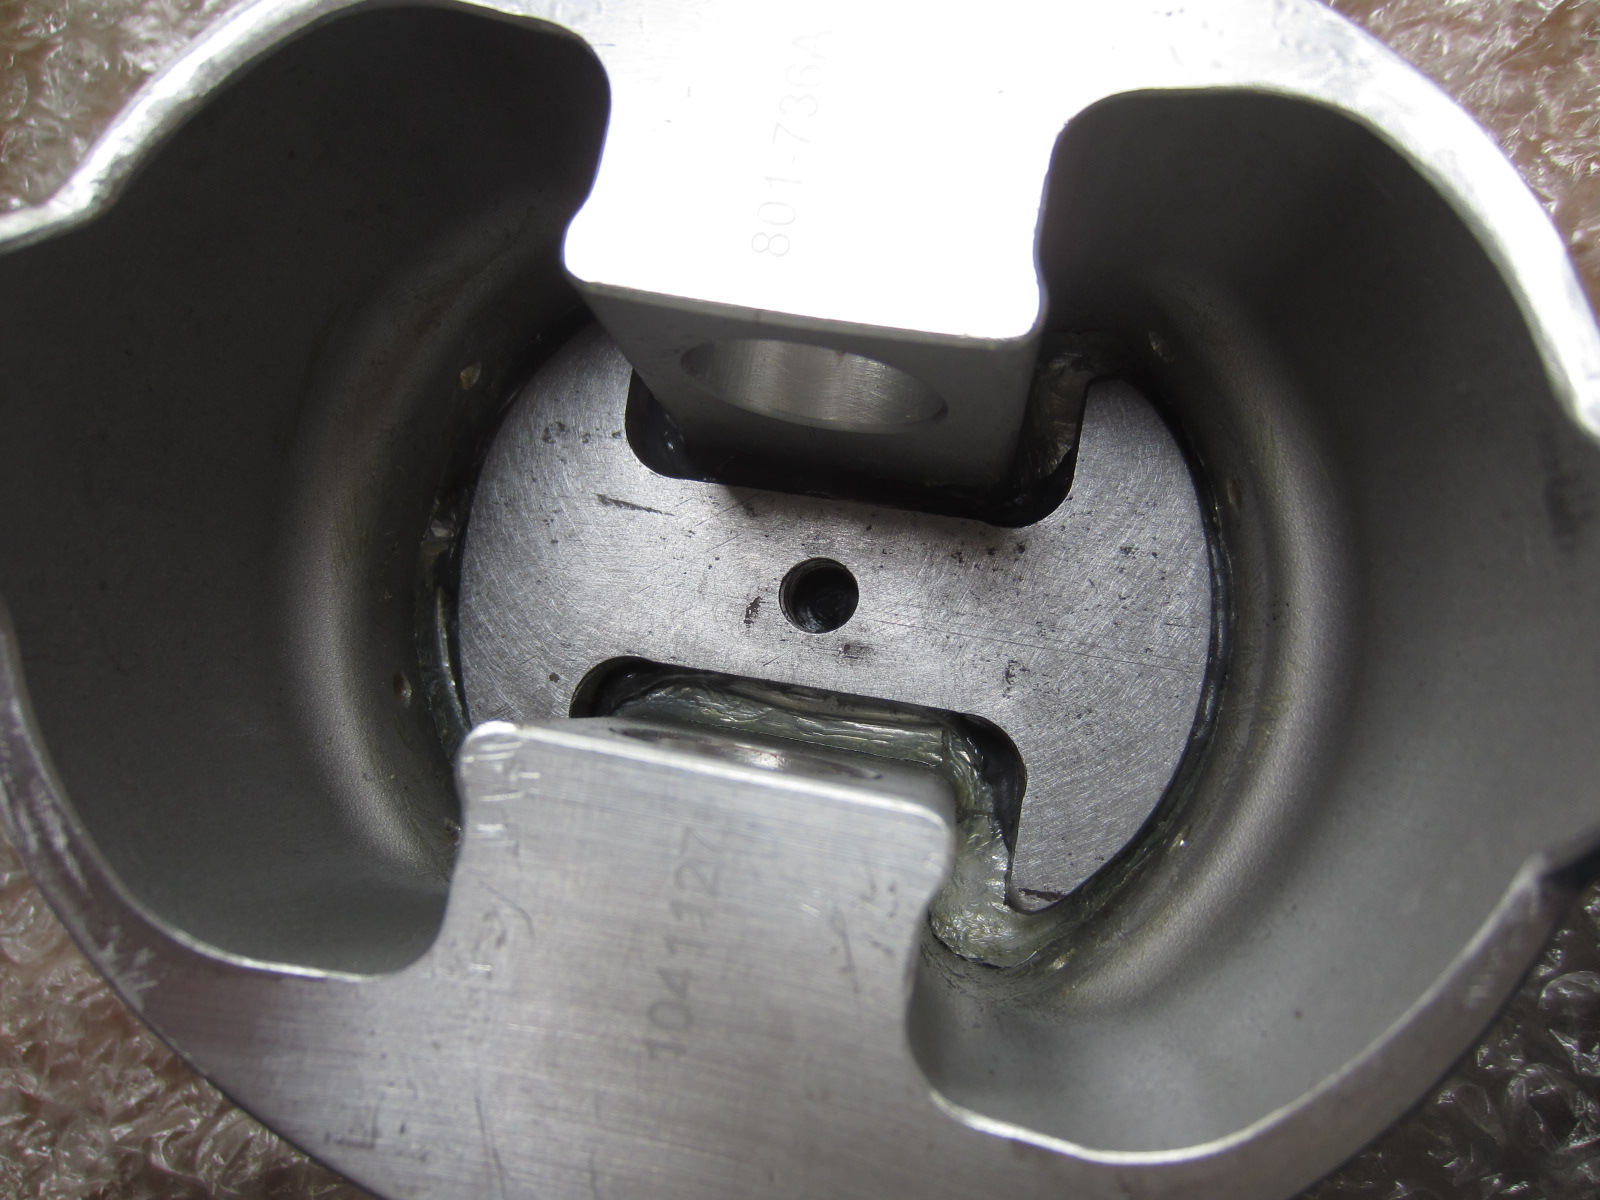
to compensate for any deviations in the actual piston and help spread the load. It is fitted with a smear of jb weld on the shim surface to fill any minor deviations. Obviously it doesn't want to be 'glued' to the piston. So i smear a layer of grease on the piston-roof/internals then a layer of cooking-foil, safely covering the area to be glued. then another layer of grease on the foil before dropping in the jb smeared shim and clamping it down and leaving overnight to properly harden.
'dogbone' shim secured within piston. you can make out the foil and excess jb squeezed out.
this probably helps understand what is going on. that piston would rock back-and-forth on the gudgeon pin. but with those screws adjusted and positioned against the shim. it can't.
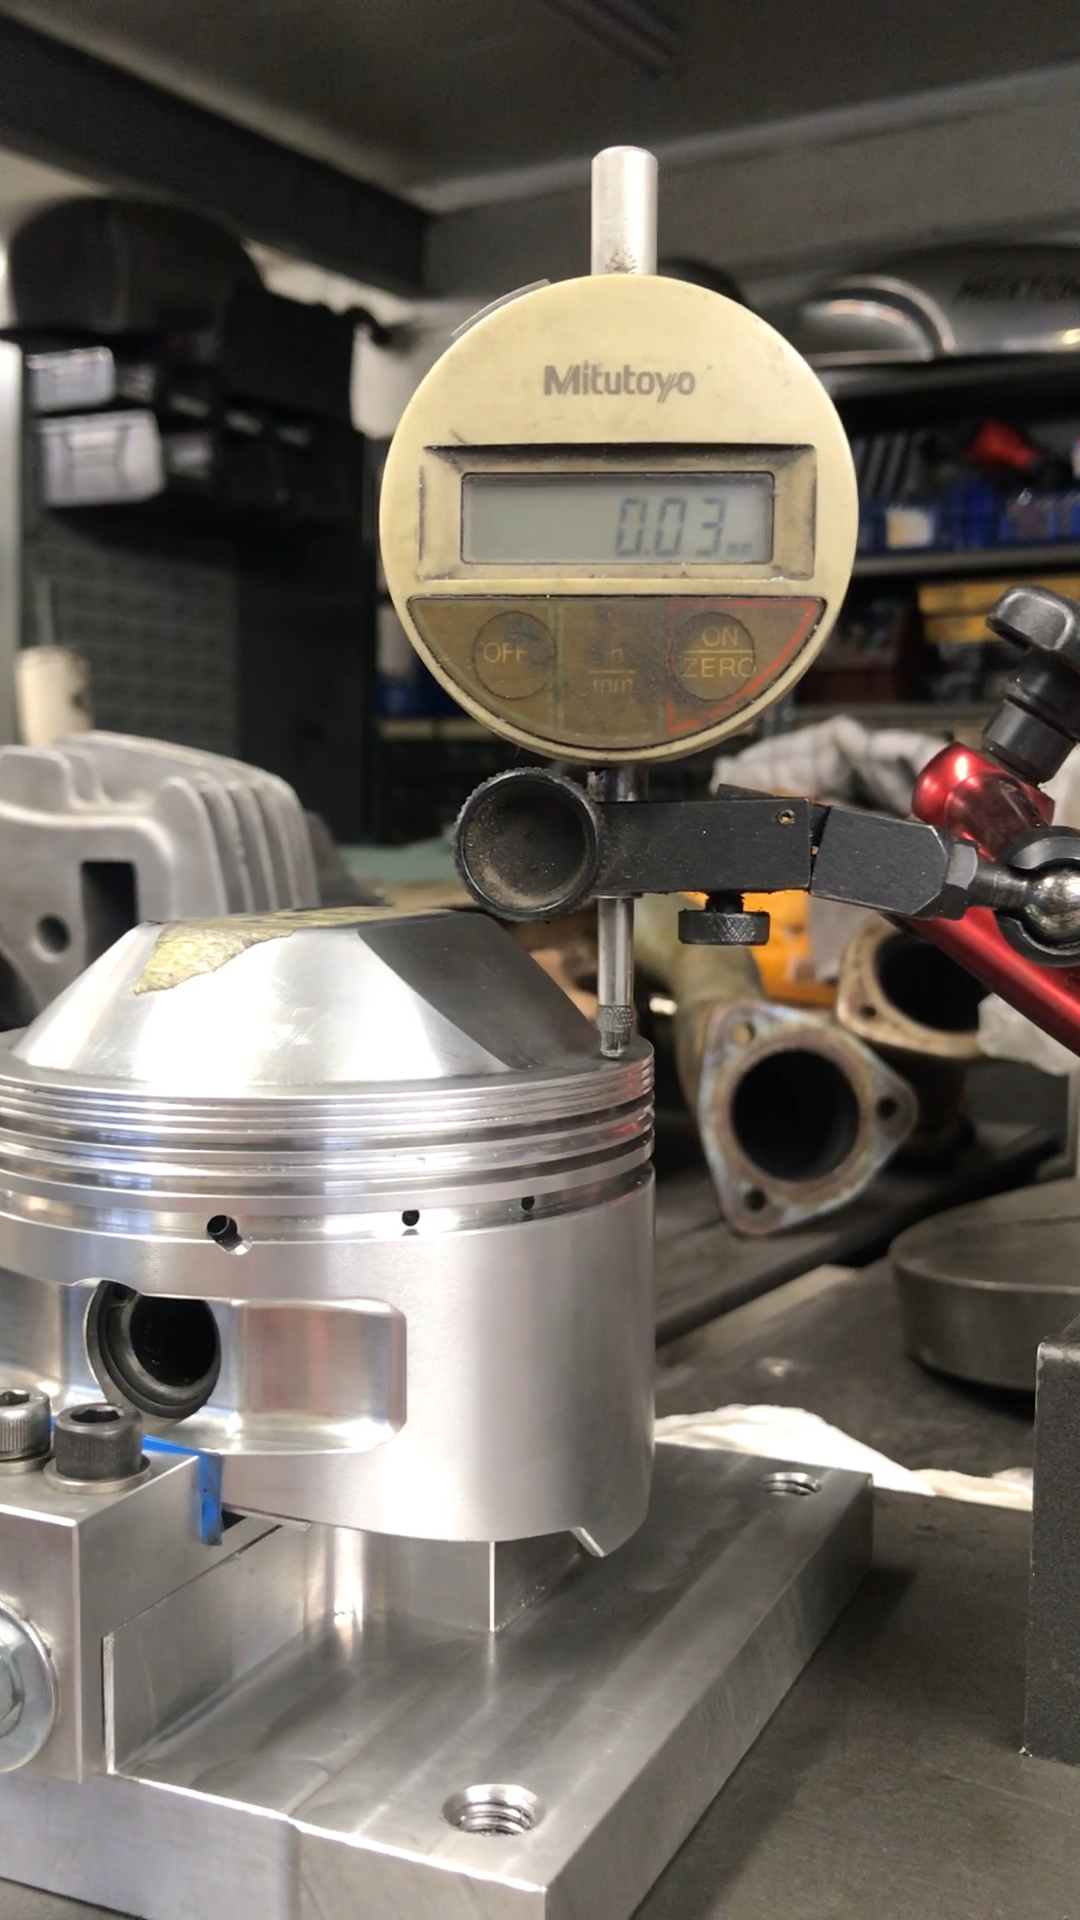
here the piston being clocked for parallelness against the base of the jig, which inturn gets bolted to a face-plate on the lathe. capice?
it was 0.03mm (0.0012") out parallel.
i'll leave it at that regarding pinions and rollers for now. they're doin' me head in.
grease-line indicating where roller-edge locates.
next update is pistons.
recall the saga of having to machine the domes to obtain the correct dome-cc to obtain desired mechanical C:R?
Though the most practicable approach would be to simply carve off the required material from the top of the piston, resulting in the same flat-top, just shallower?
I didn't want to do that. I wanted a spherical-dome of required volume to get a more 'optimal' combustion chamber by reducing obstructions and increasing 'ease' of flow/travel to combustion-mixture and flame-front etc. it's most likely unoticeable simply stooging around street-rpms etc. But it's what i wanted to do enjoying the procedure of it. The thought process, how to engineer it, the satisfaction of the solution, finished component(s). It's definitely more in the 'doing' than the 'having'?
All the homework was done and shown previously with casting a resin copy of the piston and modelling, machining, measuring etc to see what would be required. First thing would be the piston jig, how was it to be held to provide safe, reliable machining. Fucking up was not an option here. These axtell/JE pistons are not cheap and i do not want to have to buy more? They also take forever to get hold off.
google and discussions with other builder/machinsts didn't really provide a solution. it all factors on the piston-form. Some are easy to hold, they provide a register as part of the casting/forging and a jig is relatively a straight forward affair. These pistons do not provide any convenient register to work off. All solutions would have some inherent complexity, it was just which complexity was the simplest and most reliable?
Paul, the machinist I use and myself, had to come up with the best way to hold the piston providing a secure register against movement perpendicular to the gudgeon-pin, including ability to adjust and get it 'clocked' level. Similiarly a method of securing against the movement along the axis of the gudgeon-pin and allow this to be clocked too. Also security against the piston-skirt to prevent any side-ways movement. All bases covered 'X', 'Y' and 'Z'.
The result was kinda an elaborate affair, but it could not be achieved any other way really.
hopefully you can sorta figure out what's going on?
imagine a piston fitted and it would rock side-to-side and back-and-forth without the screws and could slide side-to-side too.
The 'shim' for the roof of the piston, which is 10mm steel plate is contoured to follow the internal profile of the piston.
here it is checked against a slice of a resin copy.
to compensate for any deviations in the actual piston and help spread the load. It is fitted with a smear of jb weld on the shim surface to fill any minor deviations. Obviously it doesn't want to be 'glued' to the piston. So i smear a layer of grease on the piston-roof/internals then a layer of cooking-foil, safely covering the area to be glued. then another layer of grease on the foil before dropping in the jb smeared shim and clamping it down and leaving overnight to properly harden.
'dogbone' shim secured within piston. you can make out the foil and excess jb squeezed out.
this probably helps understand what is going on. that piston would rock back-and-forth on the gudgeon pin. but with those screws adjusted and positioned against the shim. it can't.
here the piston being clocked for parallelness against the base of the jig, which inturn gets bolted to a face-plate on the lathe. capice?
it was 0.03mm (0.0012") out parallel.
jayzedkay
Club Member
So, with jig in hand
'simple' case of mounting it on the lathe and clocking to get it concentric.
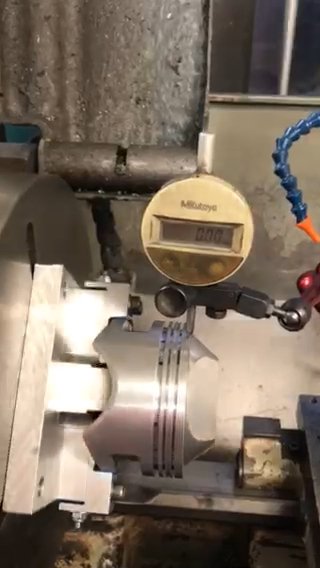
finally the machining itself.
Paul's solution to machining the actuall dome and get a nice 'analogue' result, as opposed to machining in small ever decresing x-y steps was to fabricate a reference profile of the dome required. That would act as a register for the cross-slide on the lathe.
As the cross-slide was moved inwards for the cut, the profile-register would effectively move the saddle to follow that profile on the lead-screw/feed-shaft affair, yeah?
here you can see the profile-register for the cross-slide bolted to the lathe-bed.
the cross-slide had a stud with a rounded end bolted to it that followed that profile.
I think this procedure has a proper name in the machining world, but i can't recall it?
it worked a treat anyway.
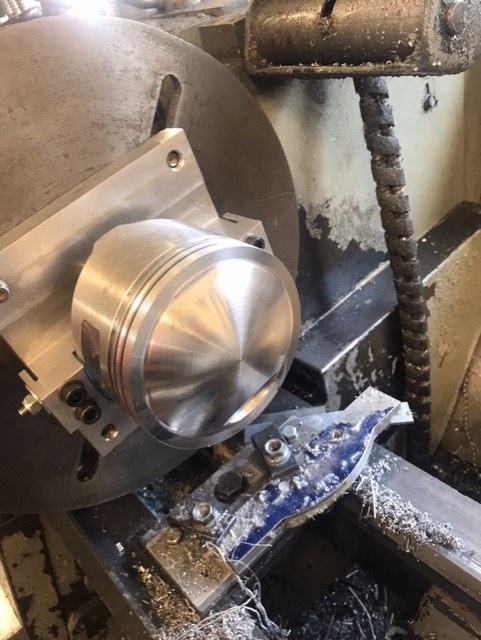
so there we have it. finally i have my pistons machined as required.
i still need to 'CC' them in a cylinder, but previous works should have them close too or at 29CC domes.
As long as they are within a CC or so, thats fine. resultant mechanical C:R will be about 10:1, giving corrected of about 9.5:1 for camshafts intended. a few fractional points either way won't matter in the real world.
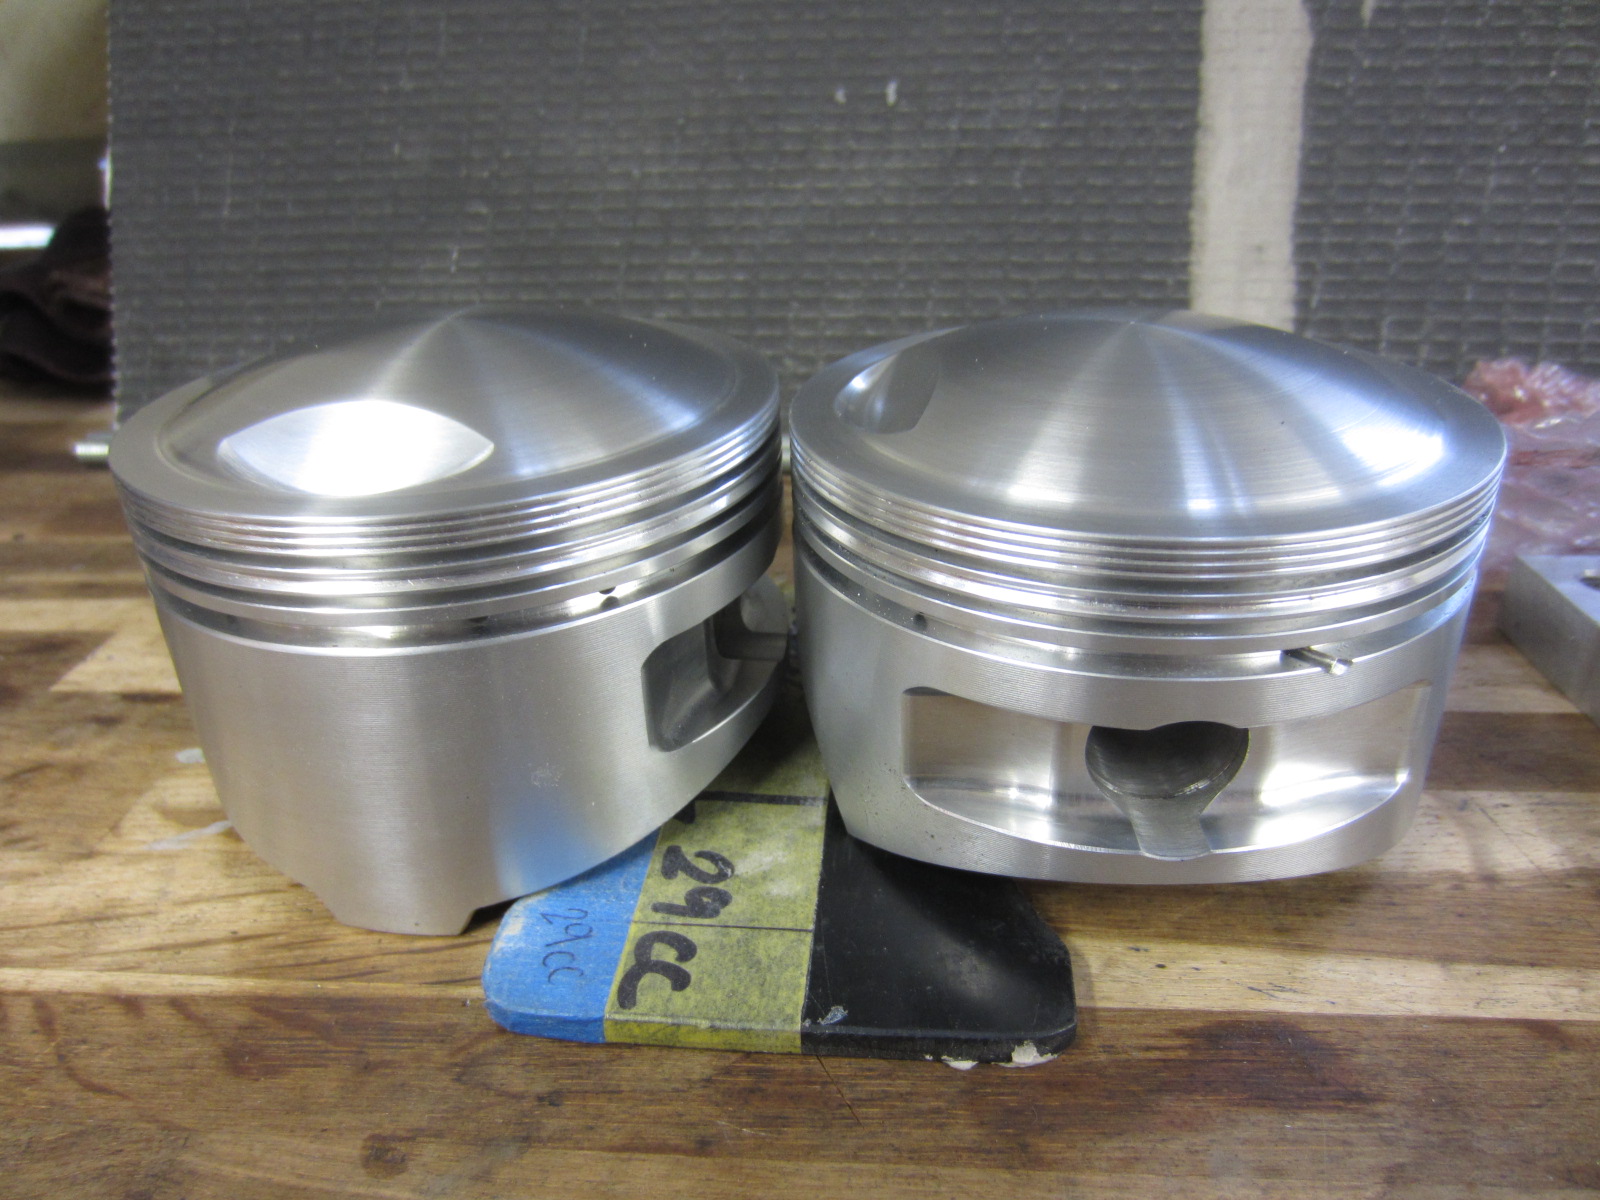
these have come out so well.
i should send images to axtell/JE and tell them they should make these with this kinda dome too.
much better for a well mannered street motor.
Those original mahoosive 53CC dome they come with is bullshit, unless you aim to run a loooooong cam and ride flat out or race or whatever?
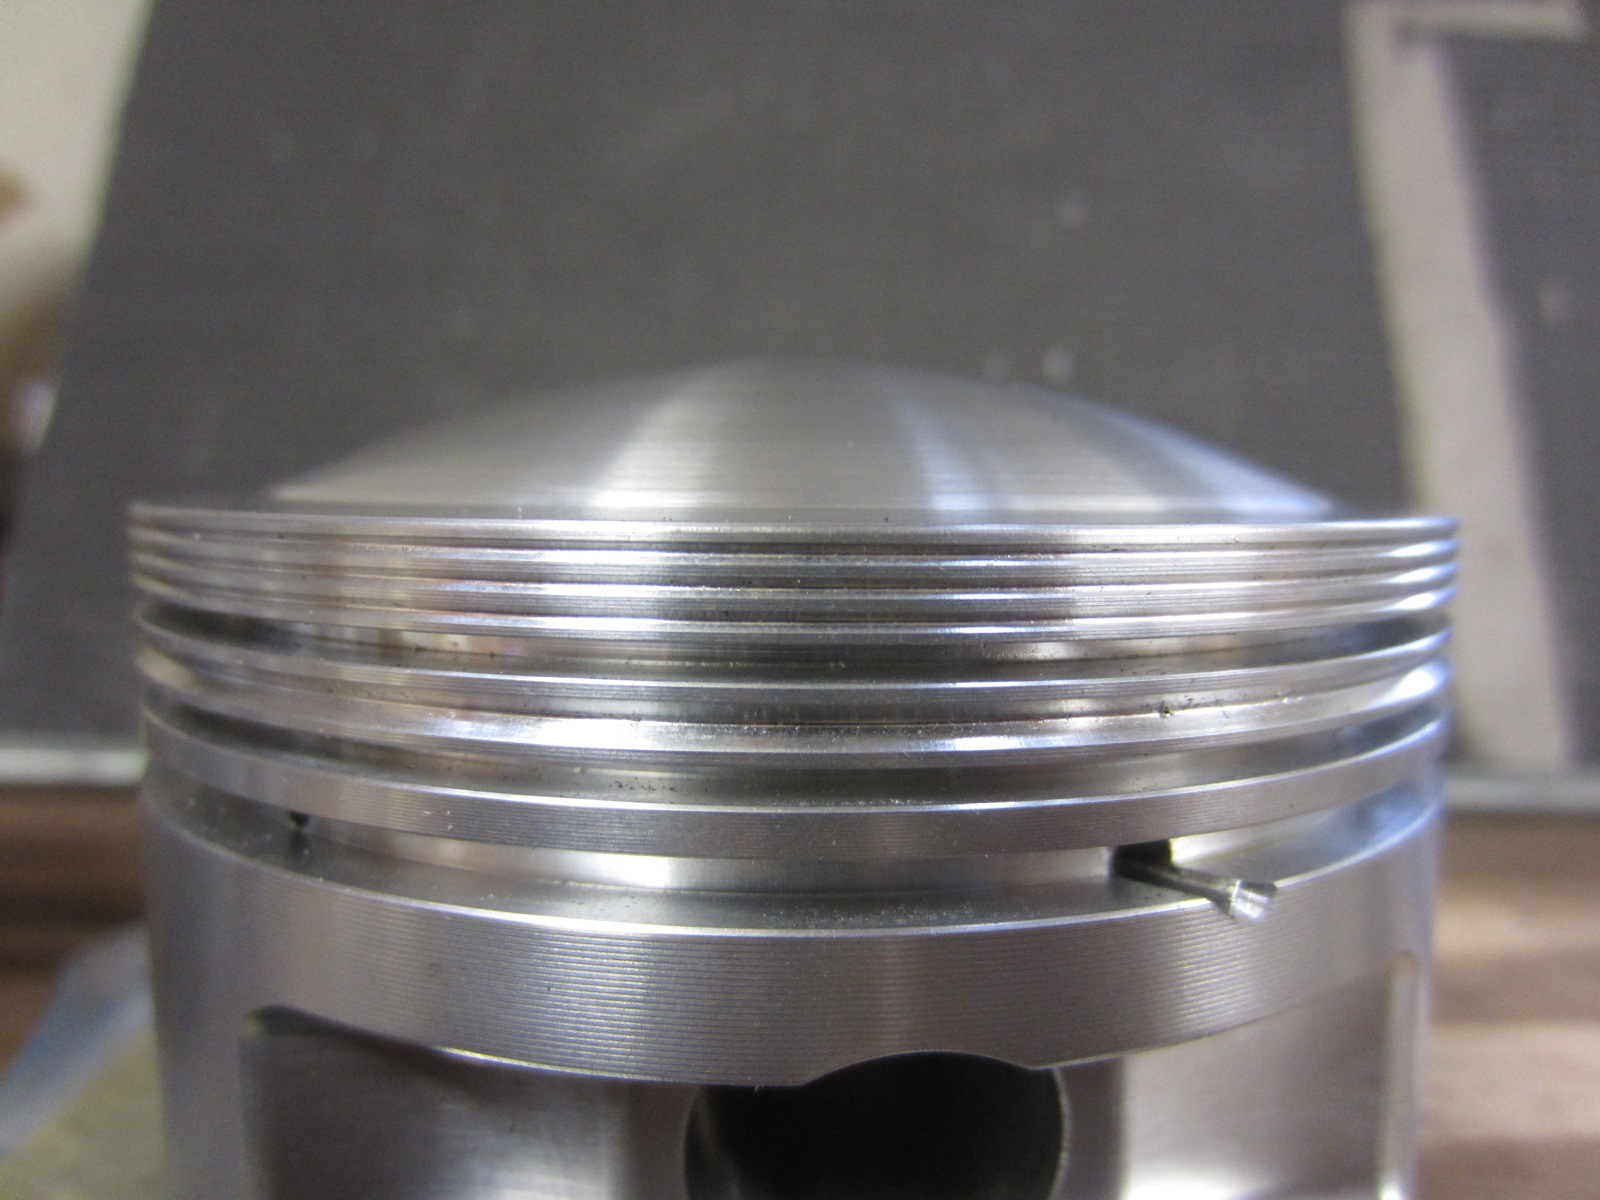
i have one image left on the quota, so here's an image of that dogbone-shim removed from a piston after machining.
there is an M6 tapped hole in the middle. simply screw in some threaded bar and pop it out. worked good.
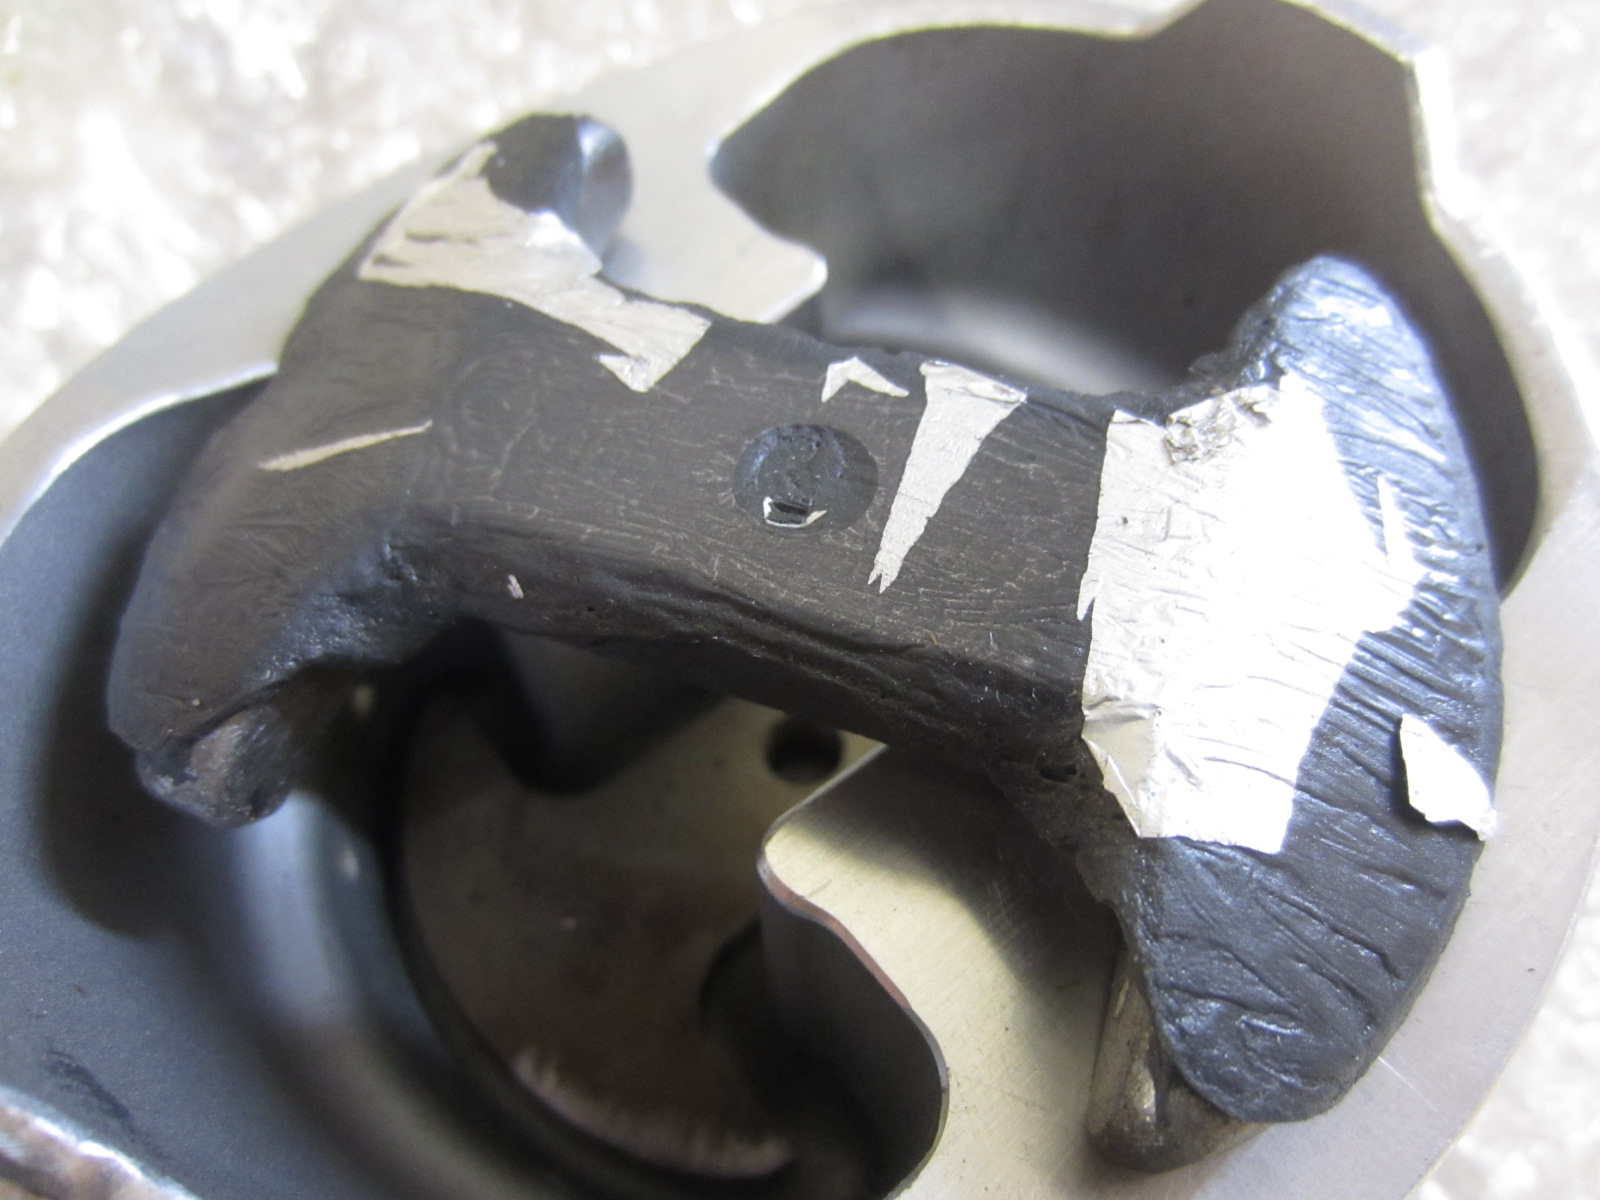
So thats it for now. i leave for work wednesday and don't return until late June.
Now that i can get piston weights, i'm really hoping to get the flywheels balanced, crank built up and lower-end assembled over the summer.
But i have so much other shit to do on my return. we'll see. wish me luck?
 .
.
'simple' case of mounting it on the lathe and clocking to get it concentric.
finally the machining itself.
Paul's solution to machining the actuall dome and get a nice 'analogue' result, as opposed to machining in small ever decresing x-y steps was to fabricate a reference profile of the dome required. That would act as a register for the cross-slide on the lathe.
As the cross-slide was moved inwards for the cut, the profile-register would effectively move the saddle to follow that profile on the lead-screw/feed-shaft affair, yeah?
here you can see the profile-register for the cross-slide bolted to the lathe-bed.
the cross-slide had a stud with a rounded end bolted to it that followed that profile.
I think this procedure has a proper name in the machining world, but i can't recall it?
it worked a treat anyway.
so there we have it. finally i have my pistons machined as required.
i still need to 'CC' them in a cylinder, but previous works should have them close too or at 29CC domes.
As long as they are within a CC or so, thats fine. resultant mechanical C:R will be about 10:1, giving corrected of about 9.5:1 for camshafts intended. a few fractional points either way won't matter in the real world.
these have come out so well.
i should send images to axtell/JE and tell them they should make these with this kinda dome too.
much better for a well mannered street motor.
Those original mahoosive 53CC dome they come with is bullshit, unless you aim to run a loooooong cam and ride flat out or race or whatever?
i have one image left on the quota, so here's an image of that dogbone-shim removed from a piston after machining.
there is an M6 tapped hole in the middle. simply screw in some threaded bar and pop it out. worked good.
So thats it for now. i leave for work wednesday and don't return until late June.
Now that i can get piston weights, i'm really hoping to get the flywheels balanced, crank built up and lower-end assembled over the summer.
But i have so much other shit to do on my return. we'll see. wish me luck?
devon.john
Club Member
old Bert Munro would just get a big file out ,,,,
nice job there J are home in September ??
Shovelfast is the 13th -15th
nice job there J are home in September ??
Shovelfast is the 13th -15th
jayzedkay
Club Member
John, he may well have. Interesting, after reading 'one good run' you lent me, the one thing that i came away with was that BM, though achieving incredible things was more from luck than judgement?
Besides, a 'big file' isn't acceptable for stuff like this. just my take on it?
unfortunately john, i'm not home through september, returning to work at the very start of it.
i'm popping over to mainland europe when i get back on the shovel, late june through to start of july and that might likely be my only riding through 2024?
if all goes to plan i'll be painting and assembling my old citroen. At least as much of it i can anyway?
softail898
Registered User
I never could get my Head around balancing a Crank. How do you deal with the 2 Con. Rods flapping about?Thanks Ron.
Next significant updates will be the process of balancing and building up the crank.
Hoping to do that over the summer once im back home.
.
Can't wait for your pics. on that.
In the YT videos I've watched, each flywheel is balanced individually, with a weight jammed in the crankpin hole to represent the desired percentage of the conrod + piston weight.I never could get my Head around balancing a Crank. How do you deal with the 2 Con. Rods flapping about?
Can't wait for your pics. on that.

